<?xml version="1.0" encoding="utf-8"?>
<feed xmlns="http://www.w3.org/2005/Atom" xmlns:media="http://search.yahoo.com/mrss/">
    <title>Paula&#x27;s random tech ramblings</title>
    <link href="https://maddox.pro/feed.xml" rel="self" />
    <link href="https://maddox.pro" />
    <updated>2026-10-26T17:53:19+00:00</updated>
    <author>
        <name>Paula</name>
    </author>
    <id>https://maddox.pro</id>

    <entry>
        <title>A big change</title>
        <author>
            <name>Paula</name>
        </author>
        <link href="https://maddox.pro/a-big-change/"/>
        <id>https://maddox.pro/a-big-change/</id>

        <updated>2026-10-26T17:53:19+00:00</updated>
            <summary type="html">
                <![CDATA[
                    As you've probably noticed, my website has changed. Yes I've removed wordpress, now this is in part due to the PHP issues but not entirely. This is something I've been thinking about doing for about 8-12 months. I am working on Gauntlet still and an&hellip;
                ]]>
            </summary>
        <content type="html">
            <![CDATA[
                <p>As you've probably noticed, my website has changed. Yes I've removed wordpress, now this is in part due to the PHP issues but not entirely. This is something I've been thinking about doing for about 8-12 months.</p>
<p>I am working on Gauntlet still and an update with pictures will be coming soon.</p>
<p> </p>
            ]]>
        </content>
    </entry>
    <entry>
        <title>So what next?</title>
        <author>
            <name>Paula</name>
        </author>
        <link href="https://maddox.pro/so-what-next/"/>
        <id>https://maddox.pro/so-what-next/</id>

        <updated>2026-09-04T15:59:11+01:00</updated>
            <summary type="html">
                <![CDATA[
                    Now that I've finished the b version of the LT6502, what next? I think I'm going to pause 6502 things for a while, I have two music projects that I would really like to start work on, but I need to finish this other music&hellip;
                ]]>
            </summary>
        <content type="html">
            <![CDATA[
                
<p>Now that I've finished the b version of the LT6502, what next?</p>


<p>I think I'm going to pause 6502 things for a while, I have two music projects that I would really like to start work on, but I need to finish this other music project first (and possibly one other project).</p>


<p>The first is a simple monosynth project, I wanted something just to get myself back into the swing of things and do something "fun" again.</p>


<figure class="post__image"><img loading="lazy" src="https://maddox.pro/media/posts/60/IMG_8386-1024x707.jpeg" alt=""  sizes="(max-width: 1920px) 100vw, 1920px" srcset="https://maddox.pro/media/posts/60/responsive/IMG_8386-1024x707-xs.jpeg 640w ,https://maddox.pro/media/posts/60/responsive/IMG_8386-1024x707-sm.jpeg 768w ,https://maddox.pro/media/posts/60/responsive/IMG_8386-1024x707-md.jpeg 1024w ,https://maddox.pro/media/posts/60/responsive/IMG_8386-1024x707-lg.jpeg 1366w ,https://maddox.pro/media/posts/60/responsive/IMG_8386-1024x707-xl.jpeg 1600w ,https://maddox.pro/media/posts/60/responsive/IMG_8386-1024x707-2xl.jpeg 1920w"></figure>


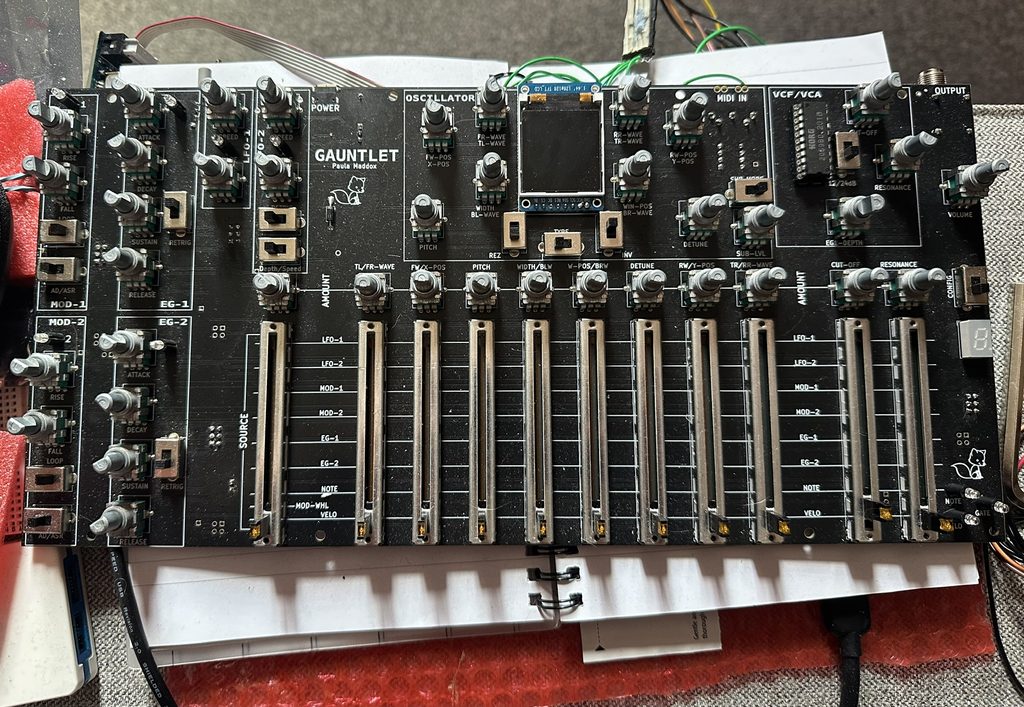
<p>This is Gauntlet, please excuse the dust, our house just seems to make dust faster than you can clean it.</p>


<p>It's a Monosynth, no patch memory, one oscillator (WTAF/Waveplane), with a "detune" which brings in a 2nd oscillator at the same volume and wave, a sub oscillator, 2 ADSRs, 2 LFOs, 2 modifiers and a Korg NJM2069 VCF/VCA. That's it. Just simple.</p>


<p>Probably the most unique thing about it is the mod matrix where the sliders select the source and the knobs above each slider control the amount. Again, quite simple.</p>


<p>It's making sound, an mostly working (a bug with the ADSRs is driving me a bit nuts), I still need to work on the oscillator modulation and add in the waveplane functionality. So it's not yet complete.</p>


<p>Will I make this as a commercial product? no, I might make a few for a couple of friends, but that's all, I don't really have the beans or inclination to run a business.</p>


<p>I'll upload a video and some sounds when I'm ready to share.</p>

            ]]>
        </content>
    </entry>
    <entry>
        <title>LT6502b complete!</title>
        <author>
            <name>Paula</name>
        </author>
        <link href="https://maddox.pro/lt6502b-complete/"/>
        <id>https://maddox.pro/lt6502b-complete/</id>

        <updated>2026-08-30T20:17:25+01:00</updated>
            <summary type="html">
                <![CDATA[
                    Well, I had a chance to get my head sorted and I finally finished the "b" version of the LT6502 Here you can see it next to the first version, I changed my mind about the case and went for translucent orange, it's way more&hellip;
                ]]>
            </summary>
        <content type="html">
            <![CDATA[
                
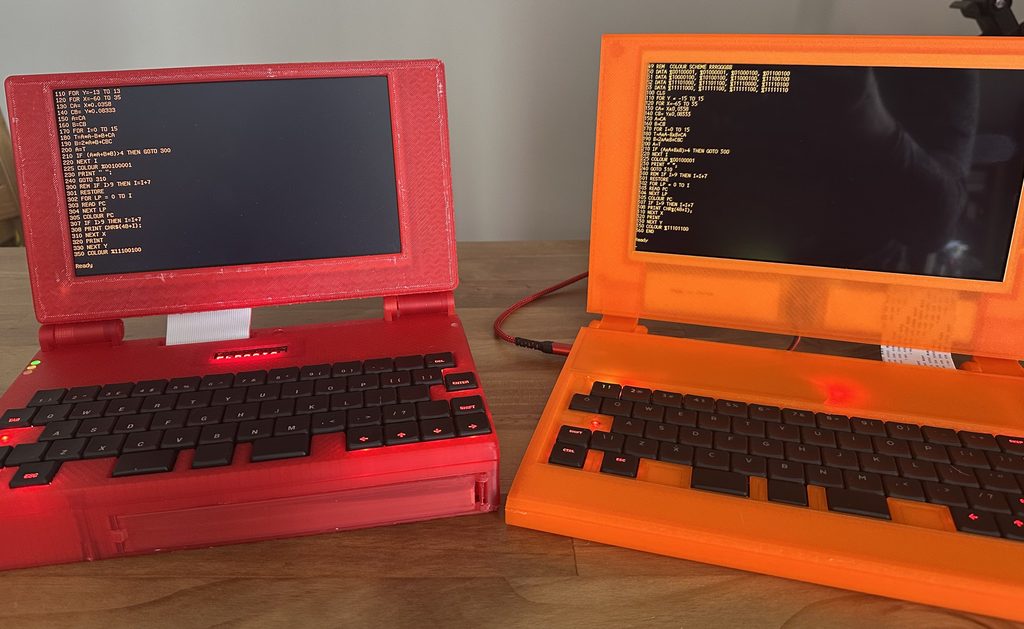
<p>Well, I had a chance to get my head sorted and I finally finished the "b" version of the LT6502</p>


<figure class="post__image"><img loading="lazy" src="https://maddox.pro/media/posts/59/IMG8369-1024x768.jpg" alt=""  sizes="(max-width: 1920px) 100vw, 1920px" srcset="https://maddox.pro/media/posts/59/responsive/IMG8369-1024x768-xs.jpg 640w ,https://maddox.pro/media/posts/59/responsive/IMG8369-1024x768-sm.jpg 768w ,https://maddox.pro/media/posts/59/responsive/IMG8369-1024x768-md.jpg 1024w ,https://maddox.pro/media/posts/59/responsive/IMG8369-1024x768-lg.jpg 1366w ,https://maddox.pro/media/posts/59/responsive/IMG8369-1024x768-xl.jpg 1600w ,https://maddox.pro/media/posts/59/responsive/IMG8369-1024x768-2xl.jpg 1920w"></figure>


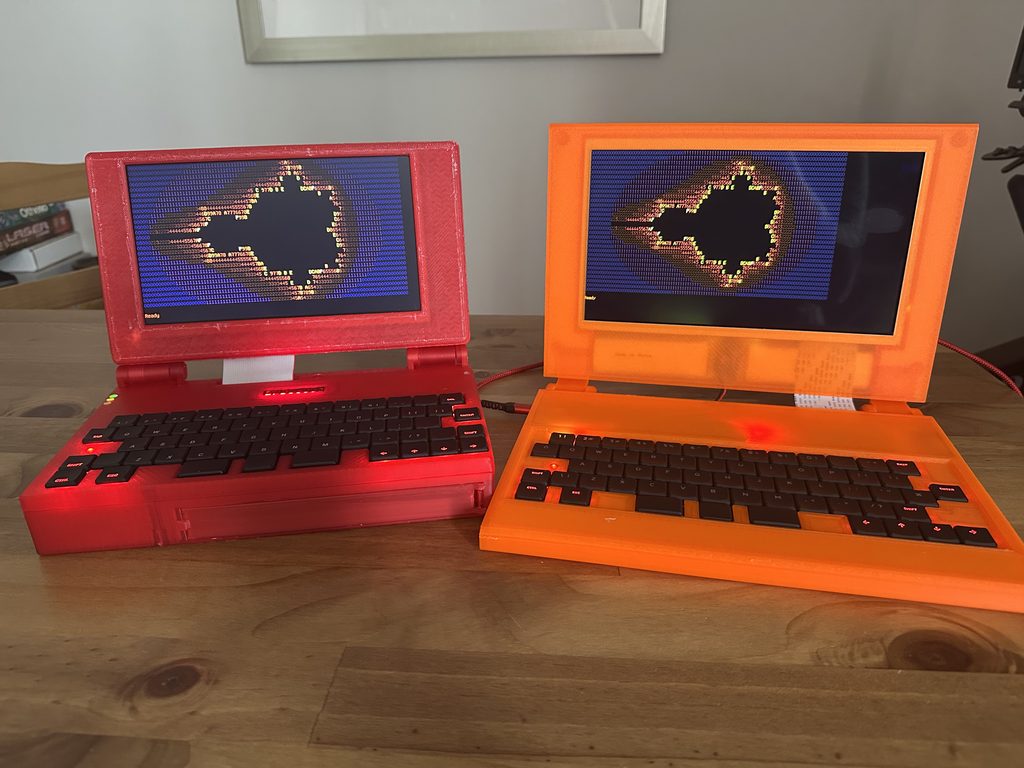
<p>Here you can see it next to the first version, I changed my mind about the case and went for translucent orange, it's way more vivid in real life. I really do like the translucent material, it's really different :)</p>


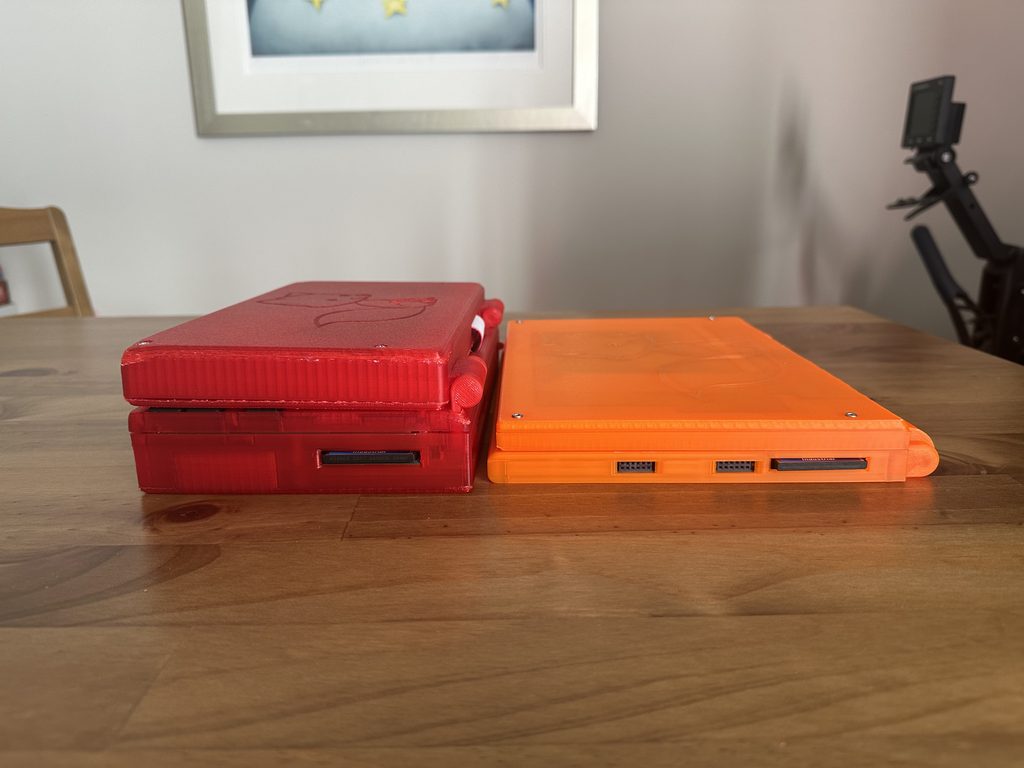
<p>The first big thing that's different, it's half the thickness of the old one;</p>


<figure class="post__image"><img loading="lazy" src="https://maddox.pro/media/posts/59/IMG8365-1024x768.jpg" alt=""  sizes="(max-width: 1920px) 100vw, 1920px" srcset="https://maddox.pro/media/posts/59/responsive/IMG8365-1024x768-xs.jpg 640w ,https://maddox.pro/media/posts/59/responsive/IMG8365-1024x768-sm.jpg 768w ,https://maddox.pro/media/posts/59/responsive/IMG8365-1024x768-md.jpg 1024w ,https://maddox.pro/media/posts/59/responsive/IMG8365-1024x768-lg.jpg 1366w ,https://maddox.pro/media/posts/59/responsive/IMG8365-1024x768-xl.jpg 1600w ,https://maddox.pro/media/posts/59/responsive/IMG8365-1024x768-2xl.jpg 1920w"></figure>


<p>It also has a larger, higher resolution screen. The screen is 1024x600 and is 10.1", the previous one was 800x480 and 9".<br>It has a similar battery capacity, so should last about the same amount of time.<br>It's a little faster, 10MHz instead of 8MHz.<br>It has a SID emulator on board and a WiFi Modem.<br>It doesn't have an expansion slot though. The aim was to make it more "sleek".</p>


<figure class="post__image"><img loading="lazy" src="https://maddox.pro/media/posts/59/IMG8370s-1024x643.jpg" alt=""  sizes="(max-width: 1920px) 100vw, 1920px" srcset="https://maddox.pro/media/posts/59/responsive/IMG8370s-1024x643-xs.jpg 640w ,https://maddox.pro/media/posts/59/responsive/IMG8370s-1024x643-sm.jpg 768w ,https://maddox.pro/media/posts/59/responsive/IMG8370s-1024x643-md.jpg 1024w ,https://maddox.pro/media/posts/59/responsive/IMG8370s-1024x643-lg.jpg 1366w ,https://maddox.pro/media/posts/59/responsive/IMG8370s-1024x643-xl.jpg 1600w ,https://maddox.pro/media/posts/59/responsive/IMG8370s-1024x643-2xl.jpg 1920w"></figure>


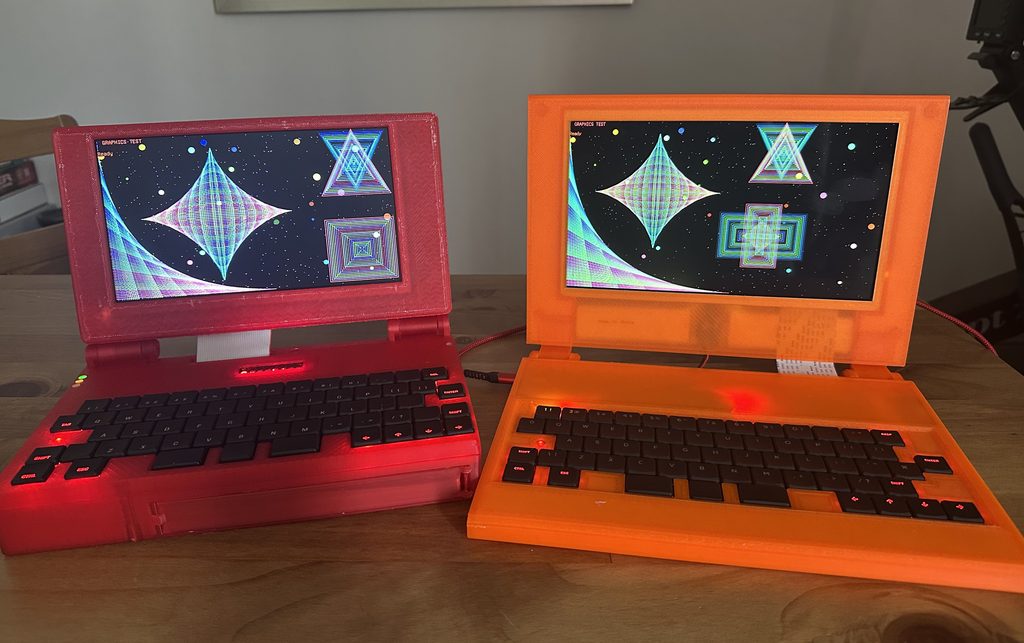
<p>The screen also has a better contrast ratio being IPS rather than regular LCD, and the higher resolution really does show.</p>


<p>Here is a good example of that, and also the extra rows of text you can fit on the screen!</p>


<figure class="post__image"><img loading="lazy" src="https://maddox.pro/media/posts/59/IMG8375-1024x629.jpg" alt=""  sizes="(max-width: 1920px) 100vw, 1920px" srcset="https://maddox.pro/media/posts/59/responsive/IMG8375-1024x629-xs.jpg 640w ,https://maddox.pro/media/posts/59/responsive/IMG8375-1024x629-sm.jpg 768w ,https://maddox.pro/media/posts/59/responsive/IMG8375-1024x629-md.jpg 1024w ,https://maddox.pro/media/posts/59/responsive/IMG8375-1024x629-lg.jpg 1366w ,https://maddox.pro/media/posts/59/responsive/IMG8375-1024x629-xl.jpg 1600w ,https://maddox.pro/media/posts/59/responsive/IMG8375-1024x629-2xl.jpg 1920w"></figure>


<p>You can find the code/PCB Files/etc all on Codeberg here - <a href="https://codeberg.org/TechPaula/LT6502b">https://codeberg.org/TechPaula/LT6502b</a></p>


<p>There are, of course, somethings I'd change</p>


<ul class="wp-block-list">
<li>The holes and support for the heat inserts need making bigger and stronger, they're VERY weak.</li>


<li>CAPSLOCK led under the capslock key</li>


<li>Find a better WiFi Modem, this is too slow and a bit flakey for real use.</li>


<li>better speaker, it works, but it's a bit "anemic"</li>


<li>Faster, start with speed in mind (i.e. figure out how to copy ROM to RAM and switch out ROM)</li>


<li>Better battery solution, I'm thinking something 18650 and on the back as part of the "hinge"</li>


<li>USB PD support that doesn't need preprogramming of the USB-PD chip to limit it at 5V, would be nice to have a buck/boost convertor to take anything USB-PD can throw at it and make it 5V</li>


<li>Better sound chip, the SID is ok, but it's a bit limited by modern standards.</li>


<li>I really want to be able to read a FAT16 file system on the CFCard rather than my own custom one.</li>
</ul>


<p></p>

            ]]>
        </content>
    </entry>
    <entry>
        <title>LT6502b the end is getting near</title>
        <author>
            <name>Paula</name>
        </author>
        <link href="https://maddox.pro/lt6502b-the-end-is-getting-near/"/>
        <id>https://maddox.pro/lt6502b-the-end-is-getting-near/</id>

        <updated>2026-06-20T20:46:03+01:00</updated>
            <summary type="html">
                <![CDATA[
                    To be honest May and June haven't been good months for my mental health, I'm not going to go any further into it than to say I've run out of beans and things have been going very slowly. BUT, I have made some progress, in&hellip;
                ]]>
            </summary>
        <content type="html">
            <![CDATA[
                
<p>To be honest May and June haven't been good months for my mental health, I'm not going to go any further into it than to say I've run out of beans and things have been going very slowly.</p>


<p>BUT, I have made some progress, in May I had this list;</p>


<ol class="wp-block-list">
<li>The SID output is incredibly quiet, much quieter than it should be.</li>


<li>“Shift” on the keyboard doesn’t yet work</li>


<li>The case needs finishing, I’ve held off until I was sure that I wouldn’t need drastic changes to the PCB</li>


<li>I would like to try and get to 14MHz (rated speed of the 65C02), I believe the ROM is making it difficult to go beyond 10MHz.</li>
</ol>


<p>So 1 (the SID being quiet) is now fixed! and 3 (case finishing) is also nearly complete;</p>


<figure class="post__image"><img loading="lazy" src="https://maddox.pro/media/posts/58/IMG_8220-1024x724.jpg" alt=""  sizes="(max-width: 1920px) 100vw, 1920px" srcset="https://maddox.pro/media/posts/58/responsive/IMG_8220-1024x724-xs.jpg 640w ,https://maddox.pro/media/posts/58/responsive/IMG_8220-1024x724-sm.jpg 768w ,https://maddox.pro/media/posts/58/responsive/IMG_8220-1024x724-md.jpg 1024w ,https://maddox.pro/media/posts/58/responsive/IMG_8220-1024x724-lg.jpg 1366w ,https://maddox.pro/media/posts/58/responsive/IMG_8220-1024x724-xl.jpg 1600w ,https://maddox.pro/media/posts/58/responsive/IMG_8220-1024x724-2xl.jpg 1920w"></figure>


<figure class="post__image"><img loading="lazy" src="https://maddox.pro/media/posts/58/IMG_8223-1024x698.jpg" alt=""  sizes="(max-width: 1920px) 100vw, 1920px" srcset="https://maddox.pro/media/posts/58/responsive/IMG_8223-1024x698-xs.jpg 640w ,https://maddox.pro/media/posts/58/responsive/IMG_8223-1024x698-sm.jpg 768w ,https://maddox.pro/media/posts/58/responsive/IMG_8223-1024x698-md.jpg 1024w ,https://maddox.pro/media/posts/58/responsive/IMG_8223-1024x698-lg.jpg 1366w ,https://maddox.pro/media/posts/58/responsive/IMG_8223-1024x698-xl.jpg 1600w ,https://maddox.pro/media/posts/58/responsive/IMG_8223-1024x698-2xl.jpg 1920w"></figure>


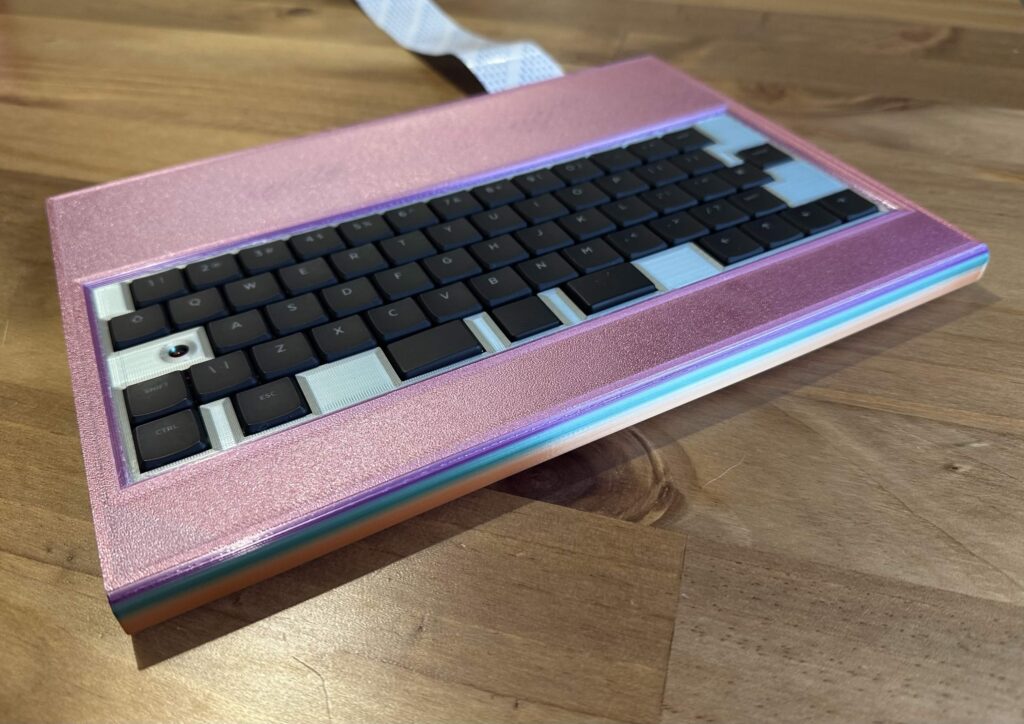
<p>As you can see, I've printed them in a colour changing PLA silk, and wow they look fab. I've also printed the screen enclosure but I don't have a photo of that yet.</p>


<p>I may reprint the lower half of the case so I can add holes for the two programming headers so I can assemble it completely and still work on the keyboard code.</p>


<p>I do have a 68040FE25V, which is a 25MHz 68040 CPU without FPU that runs on 3.3V, so that might be my next laptop project ;)<br>But I have another project I want to start first.</p>

            ]]>
        </content>
    </entry>
    <entry>
        <title>LT6502b progress</title>
        <author>
            <name>Paula</name>
        </author>
        <link href="https://maddox.pro/lt6502b-progress/"/>
        <id>https://maddox.pro/lt6502b-progress/</id>

        <updated>2026-05-10T10:24:54+01:00</updated>
            <summary type="html">
                <![CDATA[
                    A lot has happened with LT6502b since my last post. Firstly the WiFi modem is now working, I finished the UART in a CPLD and it works a treat :) Secondly it's now running at 10MHz, I can't seem to get much above that, yet.
                ]]>
            </summary>
        <content type="html">
            <![CDATA[
                
<p>A lot has happened with LT6502b since my last post.</p>


<p>Firstly the WiFi modem is now working, I finished the UART in a CPLD and it works a treat :)<br>Secondly it's now running at 10MHz, I can't seem to get much above that, yet.<br>Thirdly I've now added the nanoSwinSID chip onto the PCB and fitted the remaining keys.</p>


<figure class="post__image"><img loading="lazy" src="https://maddox.pro/media/posts/57/MainBoard-Annotated_lowerquality-1024x733.jpeg" alt="Annotate LT6502b PCB
"  sizes="(max-width: 1920px) 100vw, 1920px" srcset="https://maddox.pro/media/posts/57/responsive/MainBoard-Annotated_lowerquality-1024x733-xs.jpeg 640w ,https://maddox.pro/media/posts/57/responsive/MainBoard-Annotated_lowerquality-1024x733-sm.jpeg 768w ,https://maddox.pro/media/posts/57/responsive/MainBoard-Annotated_lowerquality-1024x733-md.jpeg 1024w ,https://maddox.pro/media/posts/57/responsive/MainBoard-Annotated_lowerquality-1024x733-lg.jpeg 1366w ,https://maddox.pro/media/posts/57/responsive/MainBoard-Annotated_lowerquality-1024x733-xl.jpeg 1600w ,https://maddox.pro/media/posts/57/responsive/MainBoard-Annotated_lowerquality-1024x733-2xl.jpeg 1920w"></figure>


<ul class="wp-block-list">
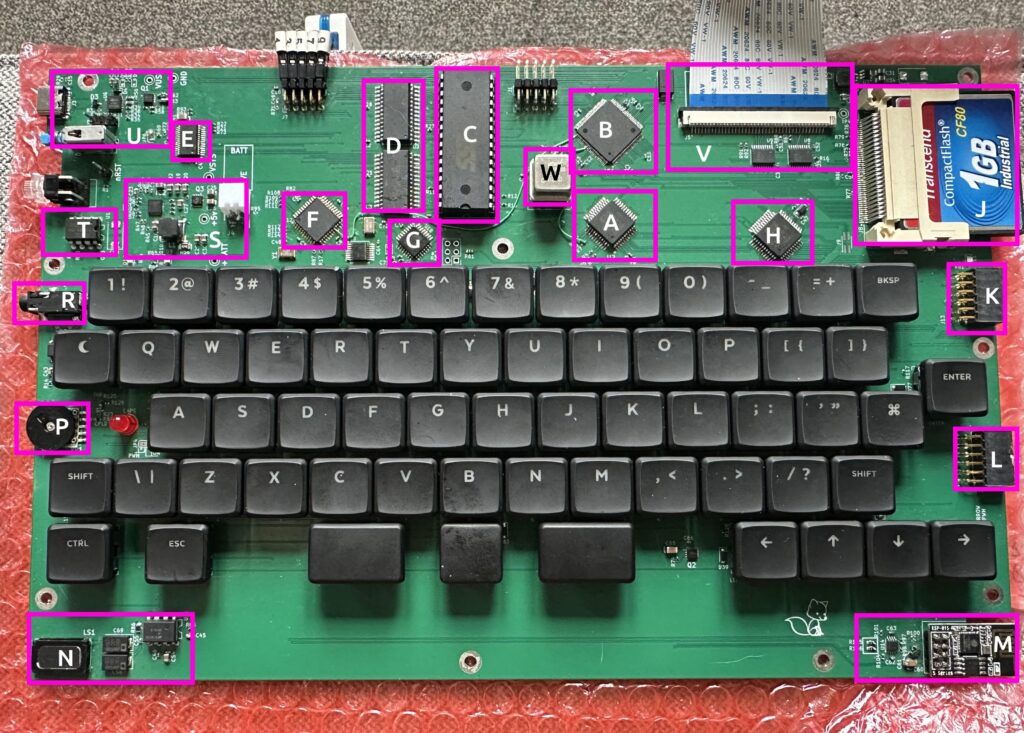
<li>A - WDC65C02 CPU, the heart of the laptop</li>


<li>B - ATF1508 CPLD, this is the glue logic and address decoding for everything, it has the WIFI UART in, Clock stretching and a whole bunch of other essentials</li>


<li>C - SST39SF010 ROM, technically a flash ROM, this holds the "bios" or operating system, it holds EhBasic and Wozmon</li>


<li>D - RAM, 48K of RAM, of which the lowest 2K is for the OS to use for input buffers, load/save buffer, stack, etc.</li>


<li>E - FT245, USB Serial chip, this is our console and is mirrored with the display and keyboard</li>


<li>F - ATMEGA644, Keyscan chip, it scans the keys and sends data over serial to the CPLD, it also talks to the WiFi over serial and provides a buffer between the WiFi modem and CPLD which has no serial buffer.</li>


<li>G - NanoSwinSID, an ATMEGA88 overclocked running SID emulation. I'm aware these aren't the most accurate emulations, but that's not what I was after, I just wanted something simple to integrate that would give me more sound options than just "beep".</li>


<li>H - WDC65C22, VIA chip, giving us a timer and two 8 bit I/O ports</li>


<li>J - Compact flash, not DOS compatible but can store 1024 programs, each up to 64KByte. Not a huge amount, but more than enough for my needs.</li>


<li>K/L - 8bit IO ports, arranged like PMODs but at 5V, these could easily be used as Joystick ports.</li>


<li>M - ESP01 WiFi Modem, very simple little thing, uses the AT command set and communicates via Serial</li>


<li>N - Speaker and amplifier for beeps and SID.</li>


<li>P - Volume control for built in speaker</li>


<li>R - line output for sound</li>


<li>S - Battery charging circuit</li>


<li>T - Reset Circuit</li>


<li>U - Power circuit for USBC-PD</li>


<li>V - Display interface and level shifters (3.3V switch mode PSU at top right of PCB).</li>


<li>W - Main clock (currently 20MHz), double that of the CPU speed, in a socket for ease of change.</li>
</ul>


<p>There are still a couple of things to sort;</p>


<ol class="wp-block-list">
<li>The SID output is incredibly quiet, much quieter than it should be.</li>


<li>"Shift" on the keyboard doesn't yet work</li>


<li>The case needs finishing, I've held off until I was sure that I wouldn't need drastic changes to the PCB</li>


<li>I would like to try and get to 14MHz (rated speed of the 65C02), I believe the ROM is making it difficult to go beyond 10MHz.</li>
</ol>


<p>But I'm very happy with the progress. In regards the ModWires, one of these is no longer needed and the other was needed to signal to the CPLD when data is waiting to be sent from the KeyController/WiFi Modem, I've updated the Schematics and PCB layout in the <a href="https://codeberg.org/TechPaula/LT6502b">repository</a>.</p>

            ]]>
        </content>
    </entry>
    <entry>
        <title>LT6502b</title>
        <author>
            <name>Paula</name>
        </author>
        <link href="https://maddox.pro/lt6502b/"/>
        <id>https://maddox.pro/lt6502b/</id>

        <updated>2026-04-18T10:27:48+01:00</updated>
            <summary type="html">
                <![CDATA[
                    As much as I love my 6502 laptop, it felt a bit "chunky" at nearly 75mm deep and I really wanted a bigger screen as 9" is a bit teeny. So I set about improving on that and the LT6502b project is underway, The main&hellip;
                ]]>
            </summary>
        <content type="html">
            <![CDATA[
                
<p>As much as I love my 6502 laptop, it felt a bit "chunky" at nearly 75mm deep and I really wanted a bigger screen as 9" is a bit teeny.</p>


<p>So I set about improving on that and the LT6502b project is underway, The main differences are;</p>


<ul class="wp-block-list">
<li>No expansion port</li>


<li>10.1" 1024 x 600 screen</li>


<li>On board SID chip (nanoSwinSID)</li>


<li>on board WiFi Modem</li>


<li>much thinner (~30mm)</li>
</ul>


<p>Things had been going very well;</p>


<figure class="post__image"><img loading="lazy" src="https://maddox.pro/media/posts/56/MainPCB_20260407-1024x790.jpg" alt="LT6502b main PCB"  sizes="(max-width: 1920px) 100vw, 1920px" srcset="https://maddox.pro/media/posts/56/responsive/MainPCB_20260407-1024x790-xs.jpg 640w ,https://maddox.pro/media/posts/56/responsive/MainPCB_20260407-1024x790-sm.jpg 768w ,https://maddox.pro/media/posts/56/responsive/MainPCB_20260407-1024x790-md.jpg 1024w ,https://maddox.pro/media/posts/56/responsive/MainPCB_20260407-1024x790-lg.jpg 1366w ,https://maddox.pro/media/posts/56/responsive/MainPCB_20260407-1024x790-xl.jpg 1600w ,https://maddox.pro/media/posts/56/responsive/MainPCB_20260407-1024x790-2xl.jpg 1920w"></figure>


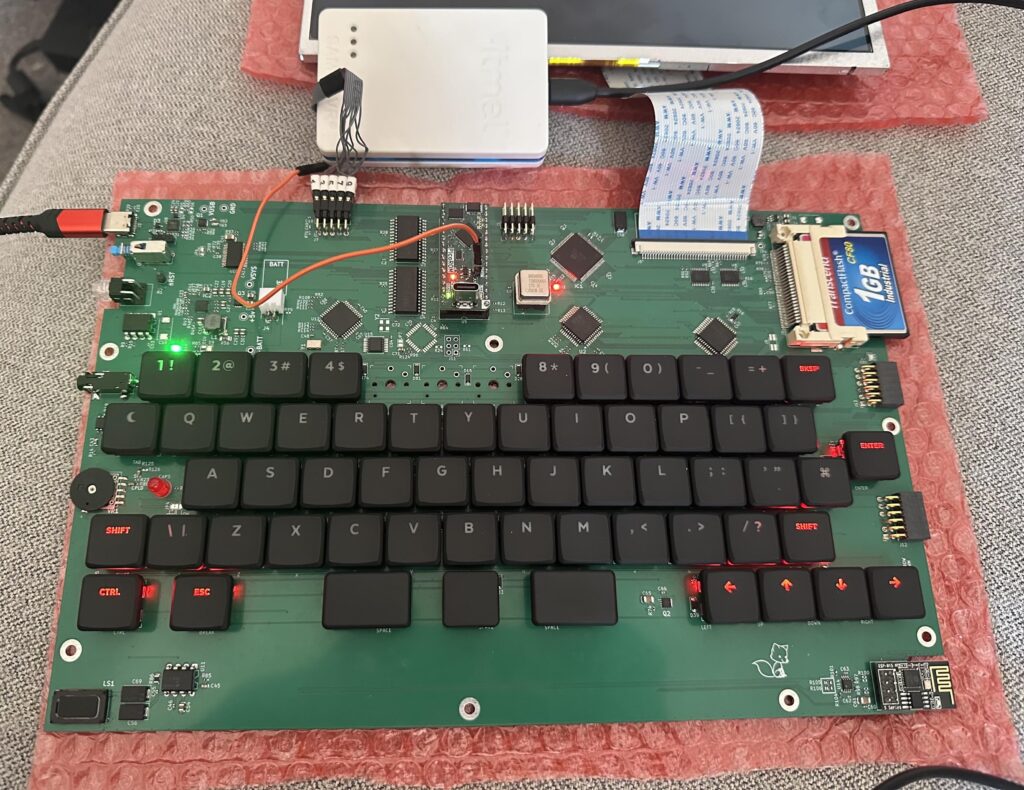
<p>Compact flash working, console working, beeper working, 6522 VIA working and display working!</p>


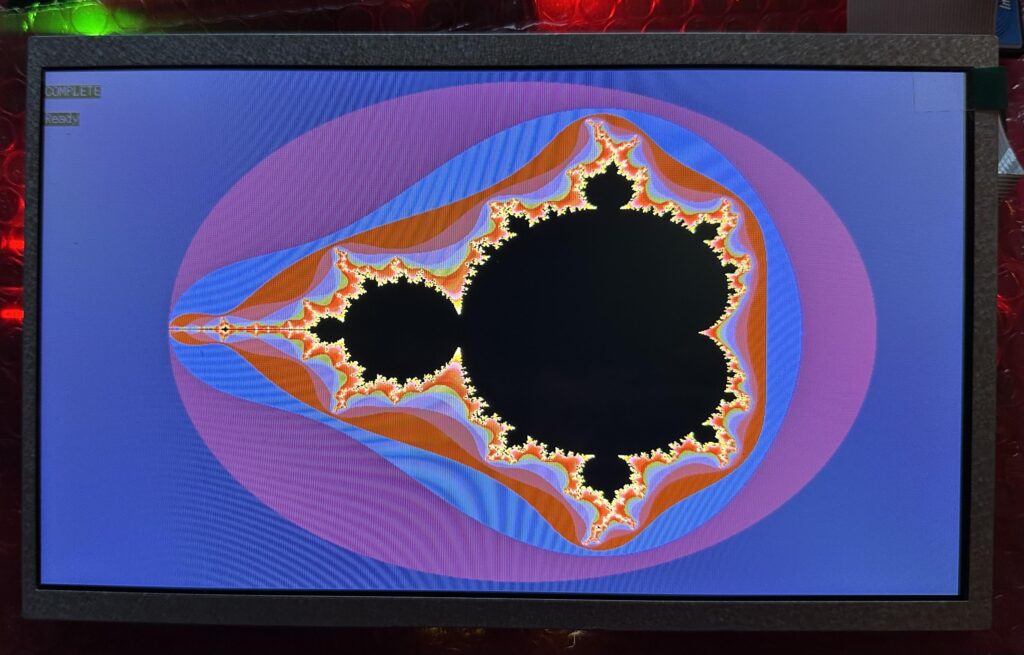
<figure class="post__image"><img loading="lazy" src="https://maddox.pro/media/posts/56/Mandelbrot_31itt_1024x600-1024x655.jpeg" alt="LT6502b Mandelbrot test"  sizes="(max-width: 1920px) 100vw, 1920px" srcset="https://maddox.pro/media/posts/56/responsive/Mandelbrot_31itt_1024x600-1024x655-xs.jpeg 640w ,https://maddox.pro/media/posts/56/responsive/Mandelbrot_31itt_1024x600-1024x655-sm.jpeg 768w ,https://maddox.pro/media/posts/56/responsive/Mandelbrot_31itt_1024x600-1024x655-md.jpeg 1024w ,https://maddox.pro/media/posts/56/responsive/Mandelbrot_31itt_1024x600-1024x655-lg.jpeg 1366w ,https://maddox.pro/media/posts/56/responsive/Mandelbrot_31itt_1024x600-1024x655-xl.jpeg 1600w ,https://maddox.pro/media/posts/56/responsive/Mandelbrot_31itt_1024x600-1024x655-2xl.jpeg 1920w"></figure>


<p>Here is a 1024 x 600 Mandelbrot with 32 iterations, looks fabulous.</p>


<p>Getting the screen working took the longest time, the new driver chip (RA8889) is way more complex than the previous RA8875 one, but was needed for the higher resolution/larger screen. That probably took me about 2 weeks to get working properly.</p>


<p>Now the problem is that I  rather naively assumed that my ATMEGA644P I use for the keyboard scanning would be able to respond to a request to read data from the CPU and put it on the data bus quickly enough to work, oh boy was I wrong :(<br>The AVR takes 5 clock cycles to respond to an interrupt and 5 to exit, even if I do the clock stretch thing down to 15:1 that still only leaves one or two cycles to get the data, enable the output on that port and put the data on the port... then I have to make the port input again at exactly the right moment.<br>The reason I did this is that I didn't want to use the 6551 VIA as it's only available in DIP format and that takes a lot of space on the PCB. What I should've done was use something like a 16C752, hey ho, lesson learned.</p>


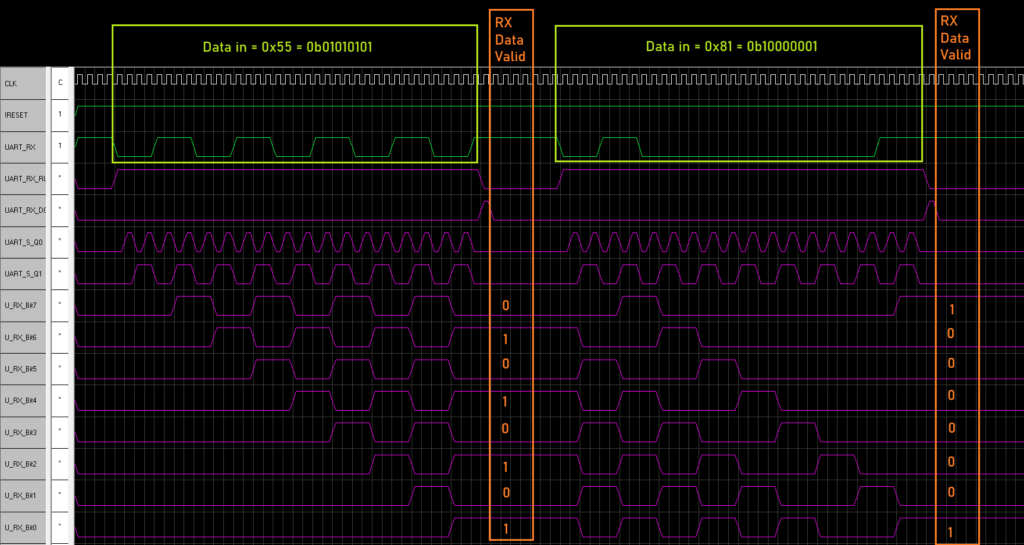
<p>Now I could respin the PCB, but that's extra cost, wasted time and money in getting this one to where it is. So I'm trying something different, I fortunately routed two pins to the main CPLD for control lines, these happen to be the unused UART pins on the AVR, so I'm trying to fit a UART inside the CPLD (you know I'm mad, right?).</p>


<p>It's been a challenge, so far I've managed to get Serial data in and into a register.</p>


<figure class="post__image"><img loading="lazy" src="https://maddox.pro/media/posts/56/UARTCPLD-1024x545.png" alt=""  sizes="(max-width: 1920px) 100vw, 1920px" srcset="https://maddox.pro/media/posts/56/responsive/UARTCPLD-1024x545-xs.png 640w ,https://maddox.pro/media/posts/56/responsive/UARTCPLD-1024x545-sm.png 768w ,https://maddox.pro/media/posts/56/responsive/UARTCPLD-1024x545-md.png 1024w ,https://maddox.pro/media/posts/56/responsive/UARTCPLD-1024x545-lg.png 1366w ,https://maddox.pro/media/posts/56/responsive/UARTCPLD-1024x545-xl.png 1600w ,https://maddox.pro/media/posts/56/responsive/UARTCPLD-1024x545-2xl.png 1920w"></figure>


<p>But it's been really difficult to get this far. Not having a clock to synchronise things to is difficult. I've not tried the transmit yet, so there is a long way to go. </p>


<p>If this fails then I will have to respin the PCB, which is something I really don't want to have to do.</p>


<p>Also I've moved out of Github due to the rampant AI rubbish being pushed on people, so I'm now on <a href="https://codeberg.org/TechPaula">Codeberg - here</a>.</p>

            ]]>
        </content>
    </entry>
    <entry>
        <title>LT6502 is assembled</title>
        <author>
            <name>Paula</name>
        </author>
        <link href="https://maddox.pro/lt6502-is-assembled/"/>
        <id>https://maddox.pro/lt6502-is-assembled/</id>

        <updated>2026-02-16T18:58:07+00:00</updated>
            <summary type="html">
                <![CDATA[
                    I give you the very chonky 6502 based laptop; It has been quite the challenge to get this up and running, the main challenges code wise were; 1) Getting the screen to work, and getting scrolling to work (that was way more effort than I&hellip;
                ]]>
            </summary>
        <content type="html">
            <![CDATA[
                
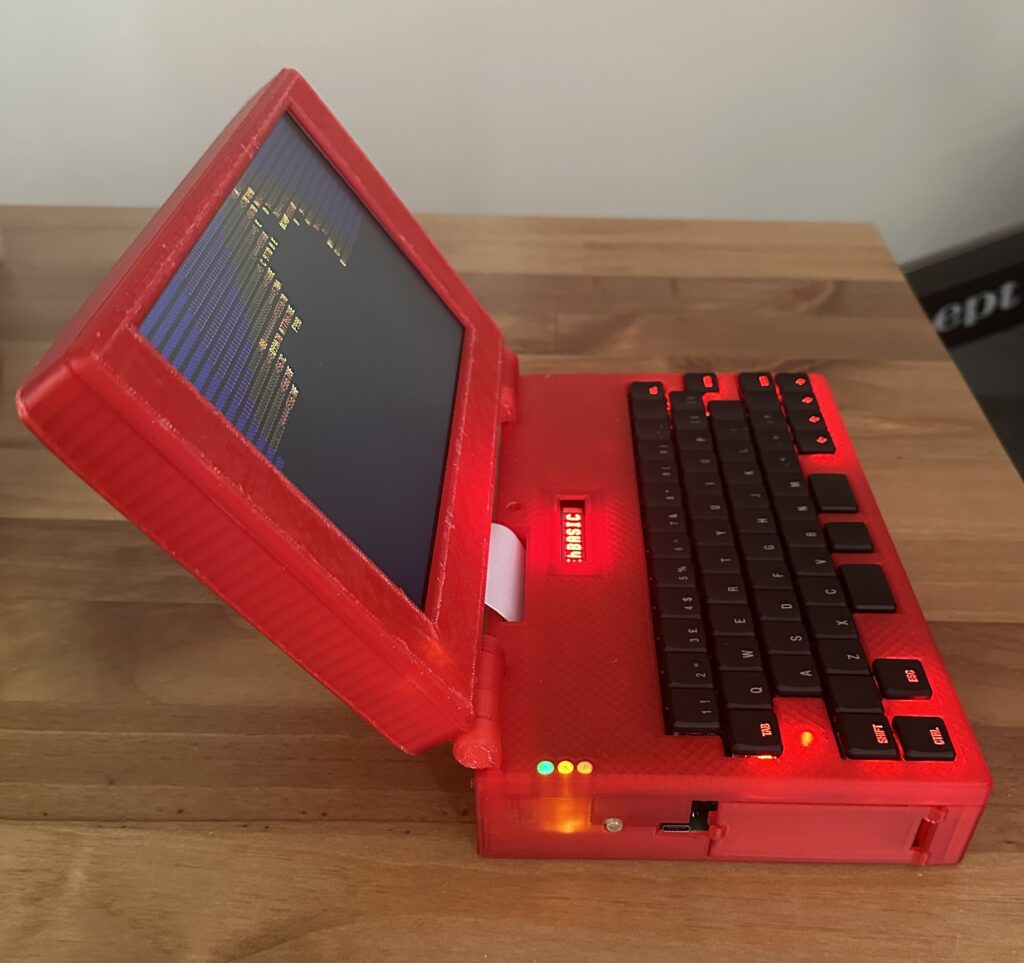
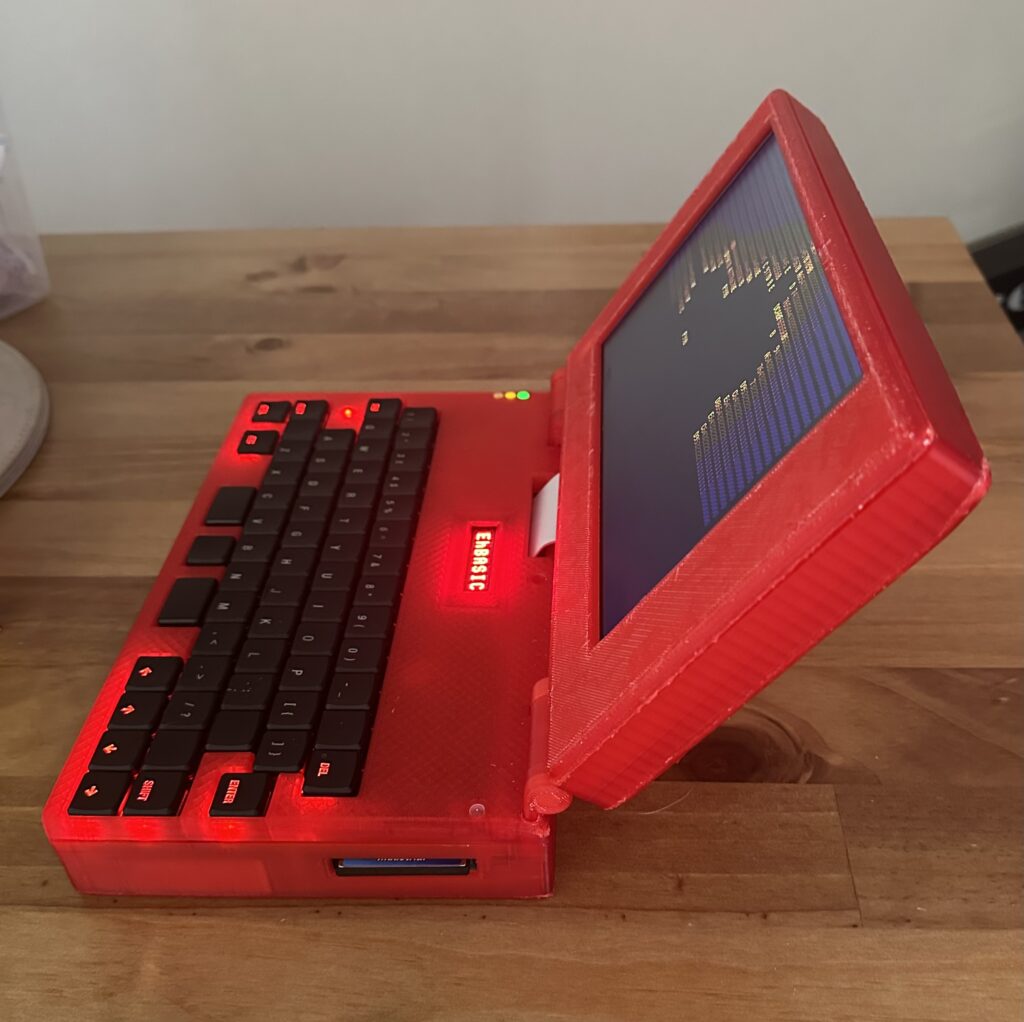
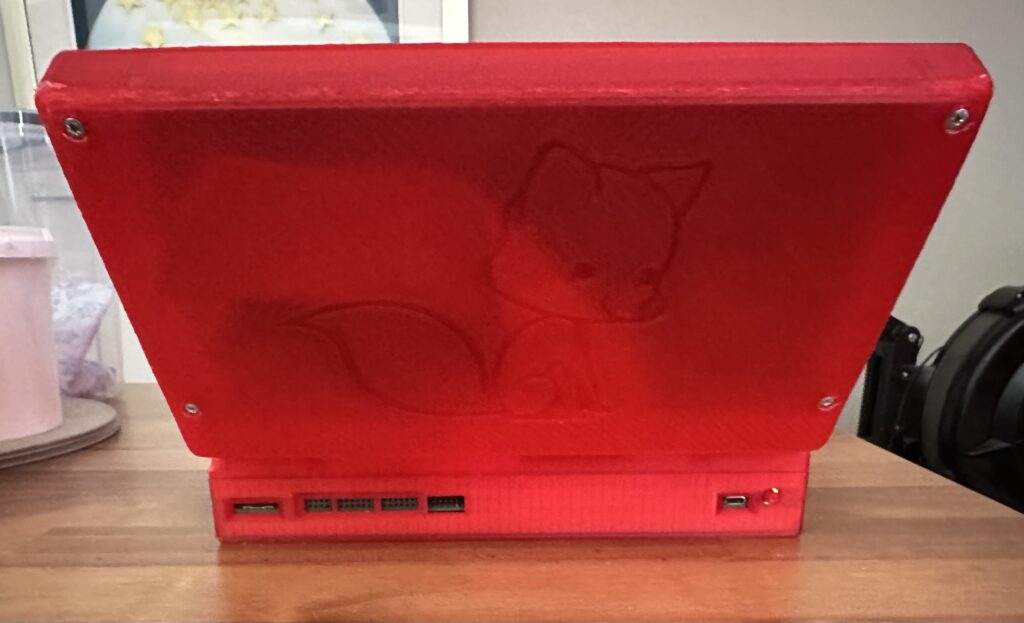
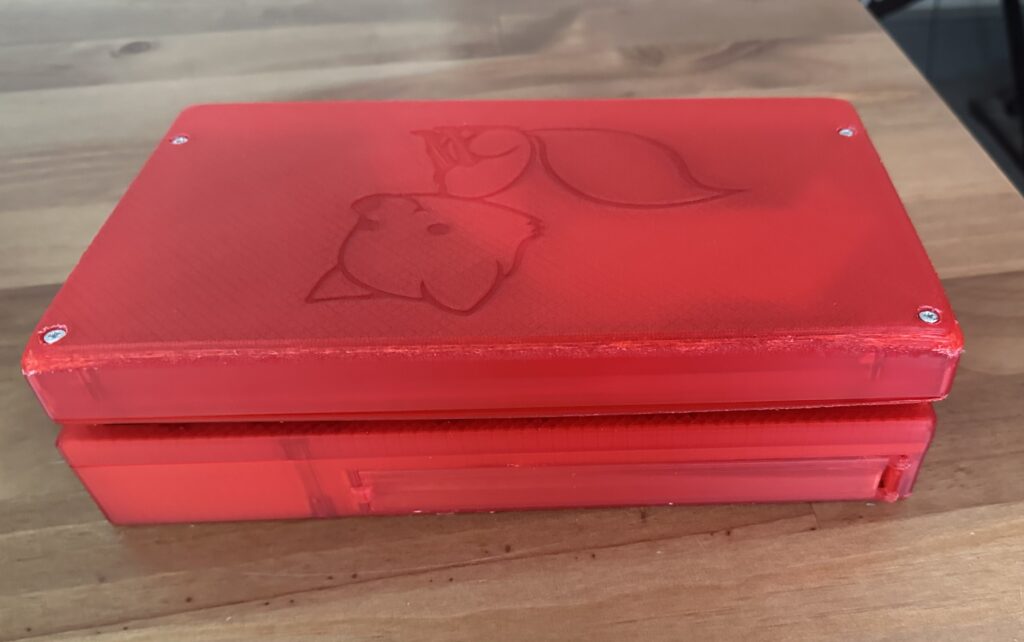
<p>I give you the very chonky 6502 based laptop;</p>


<figure class="post__image"><img loading="lazy" src="https://maddox.pro/media/posts/55/Assembled_Front_Open-940x1024.jpeg" alt=""  sizes="(max-width: 1920px) 100vw, 1920px" srcset="https://maddox.pro/media/posts/55/responsive/Assembled_Front_Open-940x1024-xs.jpeg 640w ,https://maddox.pro/media/posts/55/responsive/Assembled_Front_Open-940x1024-sm.jpeg 768w ,https://maddox.pro/media/posts/55/responsive/Assembled_Front_Open-940x1024-md.jpeg 1024w ,https://maddox.pro/media/posts/55/responsive/Assembled_Front_Open-940x1024-lg.jpeg 1366w ,https://maddox.pro/media/posts/55/responsive/Assembled_Front_Open-940x1024-xl.jpeg 1600w ,https://maddox.pro/media/posts/55/responsive/Assembled_Front_Open-940x1024-2xl.jpeg 1920w"></figure>


<p>It has been quite the challenge to get this up and running, the main challenges code wise were;<br>1) Getting the screen to work, and getting scrolling to work (that was way more effort than I thought it would be).<br>2) Understanding EhBASIC and how it works so that I could add in extra commands.</p>


<p>Talking of which here are the commands I've added;</p>


<ul class="wp-block-list">
<li>BEEP P,L - Pitch (P) is 0-255, length (L) = 0 to 255</li>


<li>CIRCLE X,Y,R,C,F - Draws a Circle, X is 0-799, Y is 0-479, R(radius) is 1 - 65535, C is 8bit RGB Value (RRRGGGBB), F is fill (0 = no fill, 1 = fill)</li>


<li>CLS - Clear screen (both graphic and text mode)</li>


<li>COLOUR &lt;0-255> - Sets the colour (text) to 8bit RGB value, in the form RRRGGGBB</li>


<li>CURSOR X,Y - Sets the cursor position (in characters)</li>


<li>DIR - Scans the Compact Flash card and shows slot number and name for any files present</li>


<li>ELIPSE - X,Y,RX,RY,C,F - Draws an elipse, X is 0-799, Y is 0-479, RX is X radius, RY is Y radius, C is colour and F is fill</li>


<li>LINE X,Y,EX,EY,C - Draws a line, X is 0-799, Y is 0-479, EX is X end point (0-799), EY is Y end point (0-479), C is colour</li>


<li>LOAD &lt;0-2047> - LOAD a file from CF</li>


<li>MODE &lt;0,1> - Sets the display mode, MODE 0 is text, MODE 1 is graphics</li>


<li>OUTK - Outputs Text to the 8 character display on the keybed, can be a string or value, anything more than 8 characters will result in text shifting. a String will clear the display and then output the characters</li>


<li>PLOT X,Y,C - Plots a dot, X is 0-799, Y is 0-479 and C is 8bit RGB Value (RRRGGGBB)</li>


<li>SAVE &lt;0-2047>,"" - SAVE current BASIC program into a SLOT and give it a name, upto 16 characters</li>


<li>SQUARE - X,Y,EX,EY,C,F - Draws a square, X is 0-799, Y is 0-479, EX is X end point (0-799), EY is Y end point (0-479), C is colour and F is fill</li>


<li>WOZMON - Jumps to wozmon, Q will exit WOZMON and return to basic (Handy for check chunks of memory)</li>
</ul>


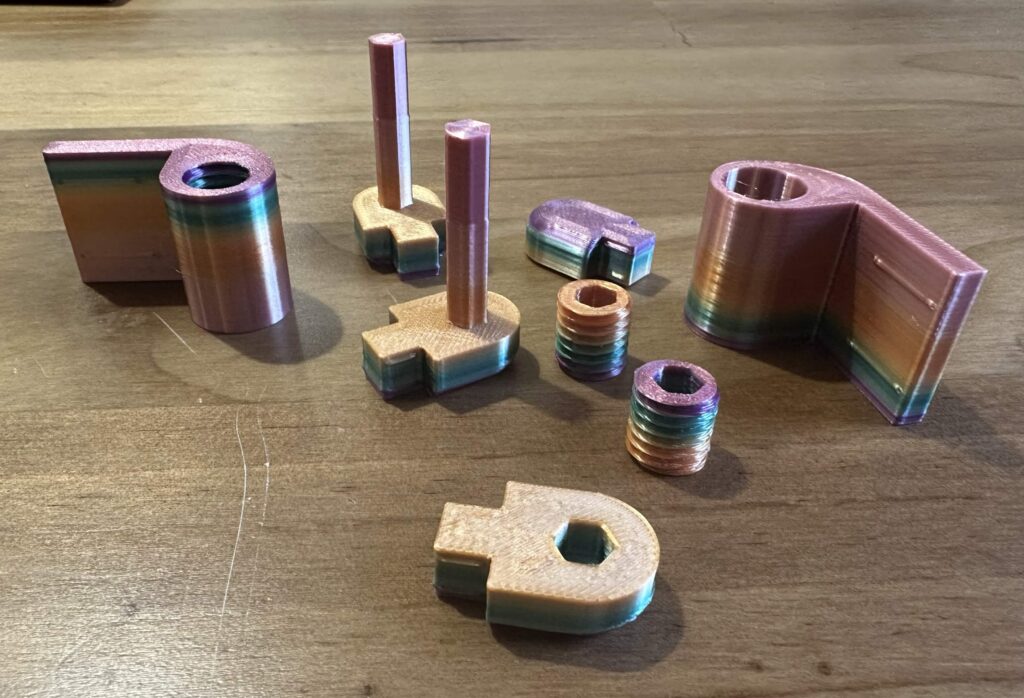
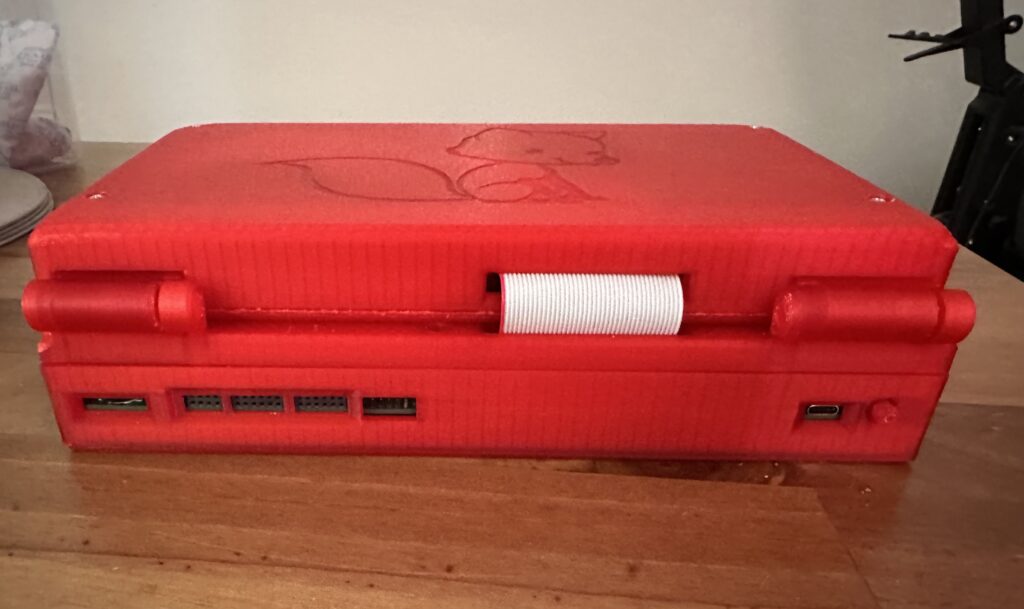
<p>The biggest challenge of all for me was the case, what you is the 3rd or 4th revision of most parts. The hinges in particular were incredibly difficult.<br>The hinges were inspired by this print - <a href="https://www.printables.com/model/658393-friction-hinge-mechanism/comments#preview.file.aPNjd">https://www.printables.com/model/658393-friction-hinge-mechanism/comments#preview.file.aPNjd</a>. It took a bit of fiddling and experimenting to get it right.</p>


<div class="gallery-wrapper"><div class="gallery" data-is-empty="false" data-translation="Add images" data-columns="3"><figure class="gallery__item"><a href="https://maddox.pro/media/posts/55/gallery/Assembled_LHS_Open-1024x963.jpeg" data-size="1024x963"><img src="https://maddox.pro/media/posts/55/gallery/Assembled_LHS_Open-1024x963-thumbnail.jpeg" alt="" width="720" height="677"></a></figure><figure class="gallery__item"><a href="https://maddox.pro/media/posts/55/gallery/Assembled_RHS_Open-1024x1022.jpeg" data-size="1024x1022"><img loading="lazy" src="https://maddox.pro/media/posts/55/gallery/Assembled_RHS_Open-1024x1022-thumbnail.jpeg" alt="" width="720" height="719"></a></figure><figure class="gallery__item"><a href="https://maddox.pro/media/posts/55/gallery/Assembled_Rear_Open-1024x623.jpeg" data-size="1024x623"><img src="https://maddox.pro/media/posts/55/gallery/Assembled_Rear_Open-1024x623-thumbnail.jpeg" alt="" width="720" height="438"></a></figure><figure class="gallery__item"><a href="https://maddox.pro/media/posts/55/gallery/Assembled_Front_Closed-1024x642.jpeg" data-size="1024x642"><img loading="lazy" src="https://maddox.pro/media/posts/55/gallery/Assembled_Front_Closed-1024x642-thumbnail.jpeg" alt="" width="720" height="451"></a></figure><figure class="gallery__item"><a href="https://maddox.pro/media/posts/55/gallery/Assembled_Rear_Closed-1024x609.jpeg" data-size="1024x609"><img loading="lazy" src="https://maddox.pro/media/posts/55/gallery/Assembled_Rear_Closed-1024x609-thumbnail.jpeg" alt="" width="720" height="428"></a></figure></div></div>


<p>The case could do with reprinting, but I've used up two 1Kg reels of translucent red filament and have only a few grams left, so I can't. Next time we order some filament I may get some more and give it a go.<br>But for my first real go at a 3D design (and a complex one at that) I'm pretty happy. I've learned a lot about 3D design and printing.</p>


<p>So, what would I do differently? a number of things;</p>


<ol class="wp-block-list">
<li>Start the design with the keybed, it's a bit squeezed in (I'm not happy with the placement of a few keys), basically I made the main PCB then tried to squeeze in the keyboard, oops.</li>


<li>Spend longer sourcing a thinner battery (this is 3x18650s), the base is very thick and this is largely down to the thickness of the battery pack. </li>


<li>Use an FFC for the display (this would make the display portion about 10mm thinner straight away!)</li>


<li>Reduce the number of smaller fiddly bits in the case. A lot of the problems I had were down to me trying to print things with 0.1mm resolution. </li>


<li>Add more clips for the case so it doesn't gape in places (front bezel around the display isn't good)</li>


<li>Electronics wise, I'd add an internal expansion port in addition to the slot at the front. Just for simple things.</li>


<li>Perhaps having some pageable RAM would be neat again, perhaps via an expansion</li>


<li>I'd probably do more with the USBC-PD, a buck/boost converter so I could get the most power from the USBC-PD, instead of forcing USBC-PD to 5V and then requesting various currents, I'm missing an opportunity to get more power, change charging speed, etc.</li>


<li>Software wise, I would've liked to get a FAT16 implementation working, but that's honestly a bit beyond me and the FAT32 examples seem to use a LOT of ROM (>8KByte).</li>


<li>I would also have liked to get the 10" screen working as the 9" is a little small, however it uses a different driver IC which has very little in the way of documentation sadly.</li>
</ol>


<figure class="wp-block-video"><video loading="lazy" controls src="https://files.mastodon.social/media_attachments/files/116/065/459/269/002/826/original/ce1706561cbed4e8.mp4"></video></figure>


<p>The onboard RA8875 display driver is connected via 8bit parallel bus and works great, it's very quick to do things like lines, circles, elipses, squares, etc. It can be a bit fiddly to get working, but when it works, it's great.</p>


<p>Next I want to add a wifimodem (front expansion slot) and possibly some kind of FPU for speeding up the math I want to do with this (mostly fractal experiments). </p>


<p>I will try and do a video at some point, not sure when, I'll post a link here when I do.</p>


<p></p>

            ]]>
        </content>
    </entry>
    <entry>
        <title>LT6502</title>
        <author>
            <name>Paula</name>
        </author>
        <link href="https://maddox.pro/lt6502/"/>
        <id>https://maddox.pro/lt6502/</id>

        <updated>2026-02-10T19:52:26+00:00</updated>
            <summary type="html">
                <![CDATA[
                    Building on the PC6502 system I decided to make a laptop 6502 system. I think there's something nice about having a portable retro system that is fully self contained. It's going very well so far. It's been quite a steep learning curve. I've been remembering&hellip;
                ]]>
            </summary>
        <content type="html">
            <![CDATA[
                
<p>Building on the PC6502 system I decided to make a laptop 6502 system. I think there's something nice about having a portable retro system that is fully self contained.</p>


<p>It's going very well so far. It's been quite a steep learning curve. I've been remembering the 6502 assembly coding I did back in the 1980s, slowly remembering.</p>


<p>It's been fun to bring the system up one bit at a time, starting EhBASIC, getting teh display working, the beeper and compact flash.</p>


<p>So here is where I'm at;</p>


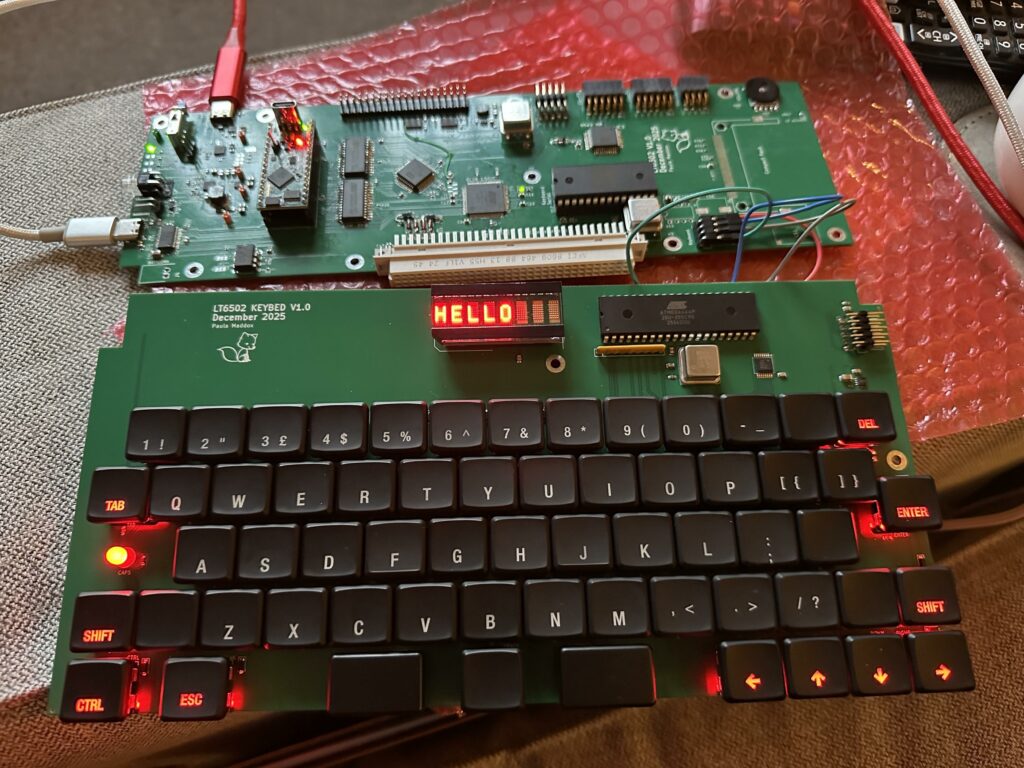
<figure class="post__image"><img loading="lazy" src="https://maddox.pro/media/posts/54/Keyboard_hello_basic_Test-1024x768.jpeg" alt=""  sizes="(max-width: 1920px) 100vw, 1920px" srcset="https://maddox.pro/media/posts/54/responsive/Keyboard_hello_basic_Test-1024x768-xs.jpeg 640w ,https://maddox.pro/media/posts/54/responsive/Keyboard_hello_basic_Test-1024x768-sm.jpeg 768w ,https://maddox.pro/media/posts/54/responsive/Keyboard_hello_basic_Test-1024x768-md.jpeg 1024w ,https://maddox.pro/media/posts/54/responsive/Keyboard_hello_basic_Test-1024x768-lg.jpeg 1366w ,https://maddox.pro/media/posts/54/responsive/Keyboard_hello_basic_Test-1024x768-xl.jpeg 1600w ,https://maddox.pro/media/posts/54/responsive/Keyboard_hello_basic_Test-1024x768-2xl.jpeg 1920w"></figure>


<p>Here was the test of the comms with the keyboard, a simple "HELLO" from basic, which is being controlled by the console port (left hand side).</p>


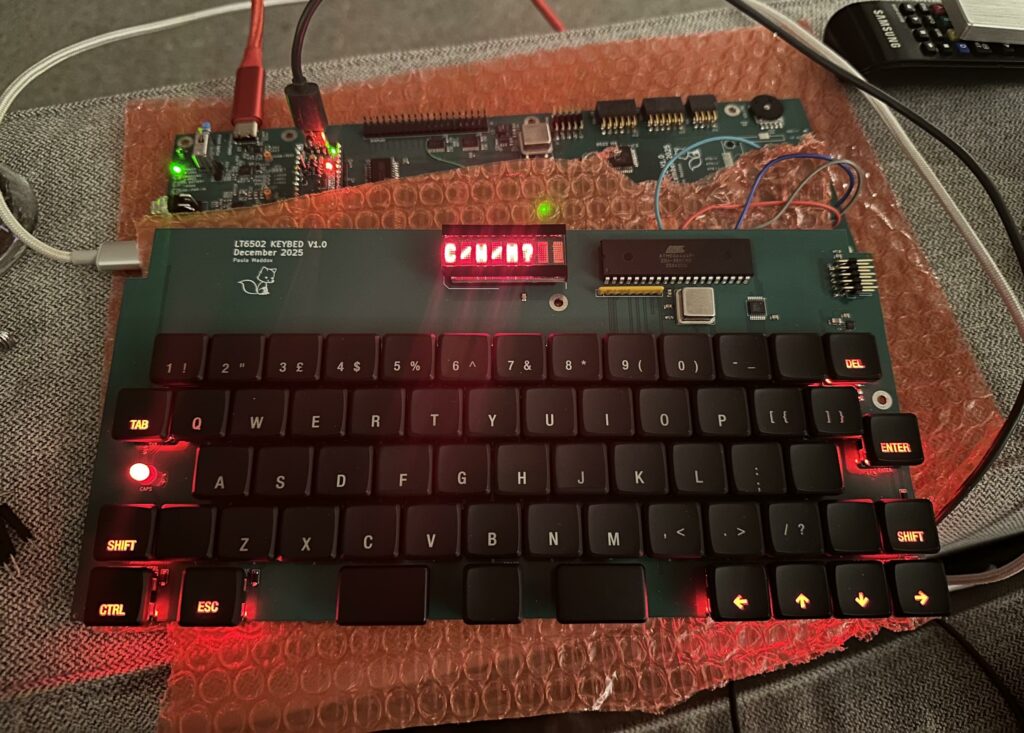
<figure class="post__image"><img loading="lazy" src="https://maddox.pro/media/posts/54/Keyboard_boot_option_integration-1024x733.jpeg" alt=""  sizes="(max-width: 1920px) 100vw, 1920px" srcset="https://maddox.pro/media/posts/54/responsive/Keyboard_boot_option_integration-1024x733-xs.jpeg 640w ,https://maddox.pro/media/posts/54/responsive/Keyboard_boot_option_integration-1024x733-sm.jpeg 768w ,https://maddox.pro/media/posts/54/responsive/Keyboard_boot_option_integration-1024x733-md.jpeg 1024w ,https://maddox.pro/media/posts/54/responsive/Keyboard_boot_option_integration-1024x733-lg.jpeg 1366w ,https://maddox.pro/media/posts/54/responsive/Keyboard_boot_option_integration-1024x733-xl.jpeg 1600w ,https://maddox.pro/media/posts/54/responsive/Keyboard_boot_option_integration-1024x733-2xl.jpeg 1920w"></figure>


<p>Next was getting the boot menu to ask if you wants a Cold, Warm or Monitor boot. </p>


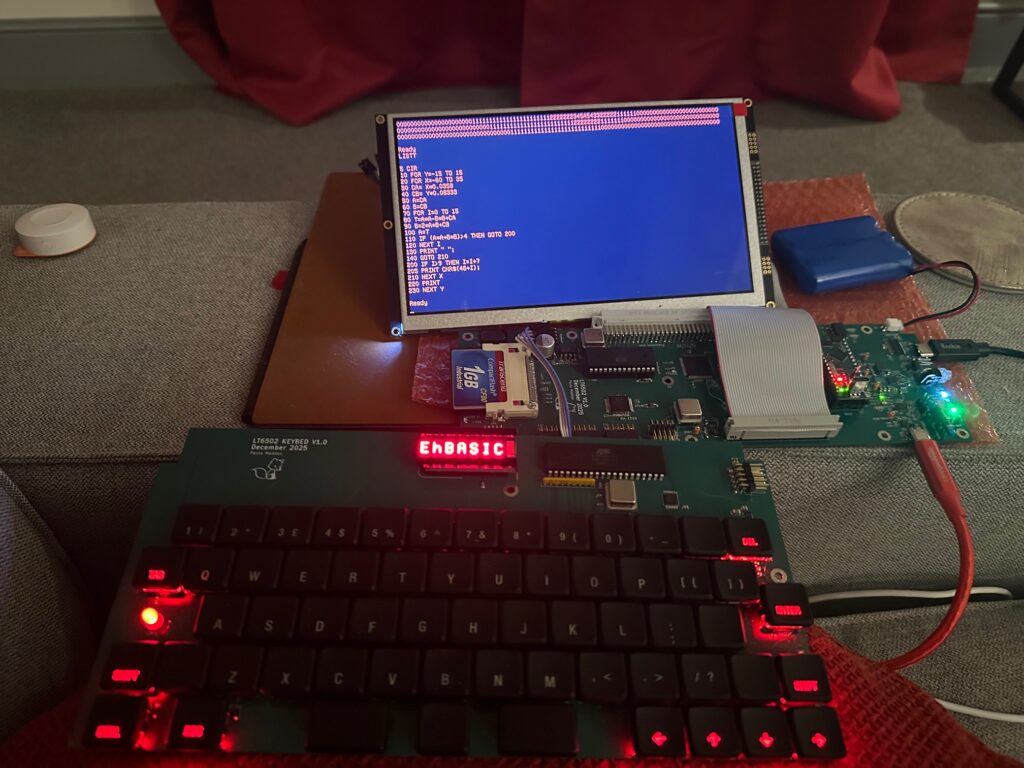
<figure class="post__image"><img loading="lazy" src="https://maddox.pro/media/posts/54/LT6502_SCREEN_BASIC-1024x768.jpeg" alt=""  sizes="(max-width: 1920px) 100vw, 1920px" srcset="https://maddox.pro/media/posts/54/responsive/LT6502_SCREEN_BASIC-1024x768-xs.jpeg 640w ,https://maddox.pro/media/posts/54/responsive/LT6502_SCREEN_BASIC-1024x768-sm.jpeg 768w ,https://maddox.pro/media/posts/54/responsive/LT6502_SCREEN_BASIC-1024x768-md.jpeg 1024w ,https://maddox.pro/media/posts/54/responsive/LT6502_SCREEN_BASIC-1024x768-lg.jpeg 1366w ,https://maddox.pro/media/posts/54/responsive/LT6502_SCREEN_BASIC-1024x768-xl.jpeg 1600w ,https://maddox.pro/media/posts/54/responsive/LT6502_SCREEN_BASIC-1024x768-2xl.jpeg 1920w"></figure>


<p>The really big milestone was getting the screen working. This was a lot of work, but so worth it. There were very definitely moments where I didn't think I could get it working. Getting the scrolling working was probably the hardest. But I got it in the end.</p>


<figure class="wp-block-video"><video loading="lazy" controls src="https://files.mastodon.social/media_attachments/files/115/971/488/668/737/700/original/5b45d403e38741af.mp4"></video></figure>


<p>I am really pleased with this, oh and the colour I chose as I find the amber easy on my eyes.</p>


<p>I've also been playing with some math functions to generated images.</p>


<figure class="post__image"><img loading="lazy" src="https://maddox.pro/media/posts/54/Bubbleverse44-1024x595.jpeg" alt=""  sizes="(max-width: 1920px) 100vw, 1920px" srcset="https://maddox.pro/media/posts/54/responsive/Bubbleverse44-1024x595-xs.jpeg 640w ,https://maddox.pro/media/posts/54/responsive/Bubbleverse44-1024x595-sm.jpeg 768w ,https://maddox.pro/media/posts/54/responsive/Bubbleverse44-1024x595-md.jpeg 1024w ,https://maddox.pro/media/posts/54/responsive/Bubbleverse44-1024x595-lg.jpeg 1366w ,https://maddox.pro/media/posts/54/responsive/Bubbleverse44-1024x595-xl.jpeg 1600w ,https://maddox.pro/media/posts/54/responsive/Bubbleverse44-1024x595-2xl.jpeg 1920w"></figure>


<p>This shows the colour really well, The screen is 800 x 480 pixels and is 8 bit colour.</p>


<p>I've also added a bunch of extra commands to basic;</p>


<ul class="wp-block-list">
<li><strong>BEEP</strong> &lt;0-255> - Beeps at a variable pitch, higher number gives a higher pitch</li>


<li><strong>CIRCLE</strong> X,Y,R,C,F - Draws a Circle, X is 0-799, Y is 0-479, R(radius) is 1 - 65535, C is 8bit RGB Value (RRRGGGBB), F is fill (0 = no fill, 1 = fill)</li>


<li><strong>CLS</strong> - Clear screen (both graphic and text mode)</li>


<li><strong>COLOUR</strong> &lt;0-255> - Sets the colour (text) to 8bit RGB value, in the form RRRGGGBB</li>


<li><strong>DIR</strong> - Scans the Compact Flash card and shows slot number and name for any files present</li>


<li><strong>LOAD</strong> &lt;0-2047> - LOAD a file from CF</li>


<li><strong>MODE</strong> &lt;0,1> - Sets the display mode, MODE 0 is text, MODE 1 is graphics</li>


<li><strong>OUTK</strong> - Outputs Text to the 8 character display on the keybed, can be a string or value, anything more than 8 characters will result in text shifting. a String will clear the display and then output the characters</li>


<li><strong>PLOT</strong> X,Y,C - Plots a dot, X is 0-799, Y is 0-479 and C is 8bit RGB Value (RRRGGGBB)</li>


<li><strong>SAVE</strong> &lt;0-2047>,"" - SAVE current BASIC program into a SLOT and give it a name, upto 16 characters</li>


<li><strong>WOZMON</strong> - Jumps to wozmon, Q will exit WOZMON and return to basic (Handy for check chunks of memory)</li>
</ul>


<p>The screen has a clever driver on it and has hardware acceleration for things like circle, line, square, fill, etc. which makes doing these things really quick.</p>


<p>Now I've started working on the case, oh boy that's a real challenge but it's getting there, slowly.</p>


<figure class="post__image"><img loading="lazy" src="https://maddox.pro/media/posts/54/LT6502_BaseCase-1024x737.jpeg" alt=""  sizes="(max-width: 1920px) 100vw, 1920px" srcset="https://maddox.pro/media/posts/54/responsive/LT6502_BaseCase-1024x737-xs.jpeg 640w ,https://maddox.pro/media/posts/54/responsive/LT6502_BaseCase-1024x737-sm.jpeg 768w ,https://maddox.pro/media/posts/54/responsive/LT6502_BaseCase-1024x737-md.jpeg 1024w ,https://maddox.pro/media/posts/54/responsive/LT6502_BaseCase-1024x737-lg.jpeg 1366w ,https://maddox.pro/media/posts/54/responsive/LT6502_BaseCase-1024x737-xl.jpeg 1600w ,https://maddox.pro/media/posts/54/responsive/LT6502_BaseCase-1024x737-2xl.jpeg 1920w"></figure>


<p>You can find more info and all the files so far on my git hub here - <a href="https://github.com/TechPaula/LT6502">https://github.com/TechPaula/LT6502</a></p>

            ]]>
        </content>
    </entry>
    <entry>
        <title>PC6502 + Transputer</title>
        <author>
            <name>Paula</name>
        </author>
        <link href="https://maddox.pro/pc6502-transputer/"/>
        <id>https://maddox.pro/pc6502-transputer/</id>

        <updated>2025-12-27T23:24:48+00:00</updated>
            <summary type="html">
                <![CDATA[
                    So, yeah, I have a thing for transputers, don't ask me why, I don't know. I've always been fascinated.... Anyway, I finally managed to get some reliable and repeatable comms between my 6502 tower and a T425 TRAM. Here you can see the data going&hellip;
                ]]>
            </summary>
        <content type="html">
            <![CDATA[
                
<p>So, yeah, I have a thing for transputers, don't ask me why, I don't know. I've always been fascinated....</p>


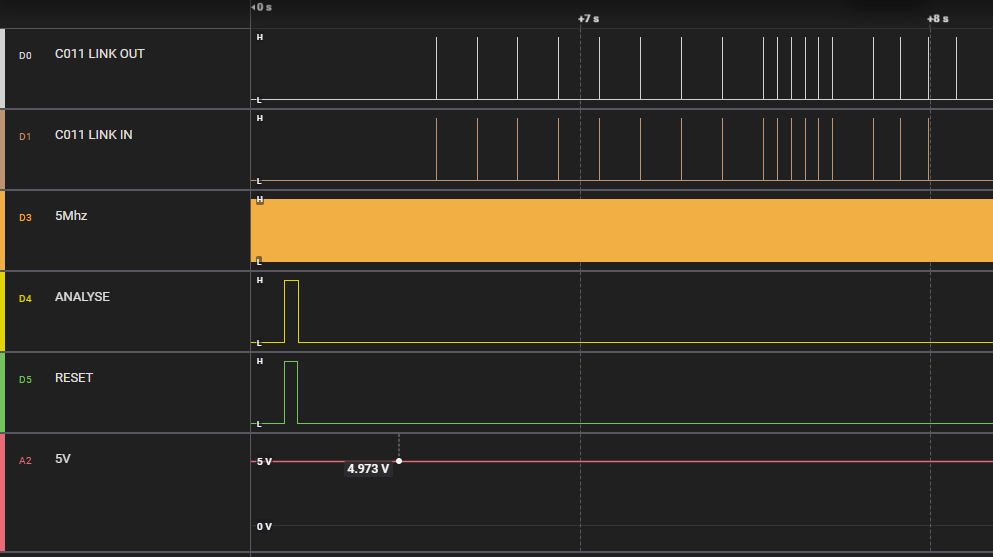
<p>Anyway, I finally managed to get some reliable and repeatable comms between my 6502 tower and a T425 TRAM.</p>


<figure class="post__image"><img loading="lazy" src="https://maddox.pro/media/posts/53/8c50dd3f985b81fd.png" alt=""  sizes="(max-width: 1920px) 100vw, 1920px" srcset="https://maddox.pro/media/posts/53/responsive/8c50dd3f985b81fd-xs.png 640w ,https://maddox.pro/media/posts/53/responsive/8c50dd3f985b81fd-sm.png 768w ,https://maddox.pro/media/posts/53/responsive/8c50dd3f985b81fd-md.png 1024w ,https://maddox.pro/media/posts/53/responsive/8c50dd3f985b81fd-lg.png 1366w ,https://maddox.pro/media/posts/53/responsive/8c50dd3f985b81fd-xl.png 1600w ,https://maddox.pro/media/posts/53/responsive/8c50dd3f985b81fd-2xl.png 1920w"></figure>


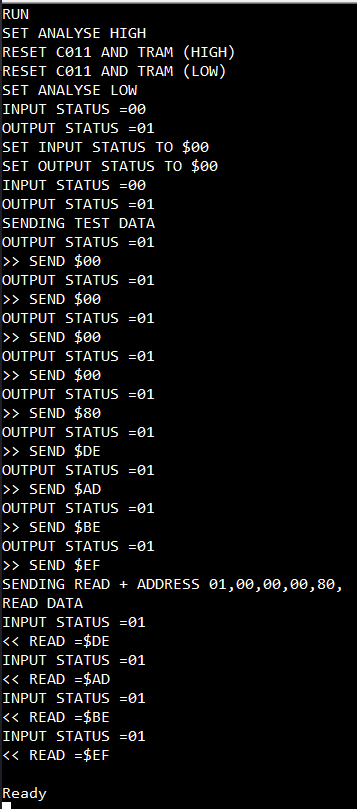
<p>Here you can see the data going out, and coming back in! In this case writing 0xEFBEADDE to address 0x80000000 (T425 internal RAM). Now this was supposed to be 0xDEADBEEF, but of course, the transputer is little endian.<br>Anyway, output from BASIC program is below;</p>


<figure class="post__image"><img loading="lazy" src="https://maddox.pro/media/posts/53/851cdc8d35703c12.png" alt=""  sizes="(max-width: 1920px) 100vw, 1920px" srcset="https://maddox.pro/media/posts/53/responsive/851cdc8d35703c12-xs.png 640w ,https://maddox.pro/media/posts/53/responsive/851cdc8d35703c12-sm.png 768w ,https://maddox.pro/media/posts/53/responsive/851cdc8d35703c12-md.png 1024w ,https://maddox.pro/media/posts/53/responsive/851cdc8d35703c12-lg.png 1366w ,https://maddox.pro/media/posts/53/responsive/851cdc8d35703c12-xl.png 1600w ,https://maddox.pro/media/posts/53/responsive/851cdc8d35703c12-2xl.png 1920w"></figure>


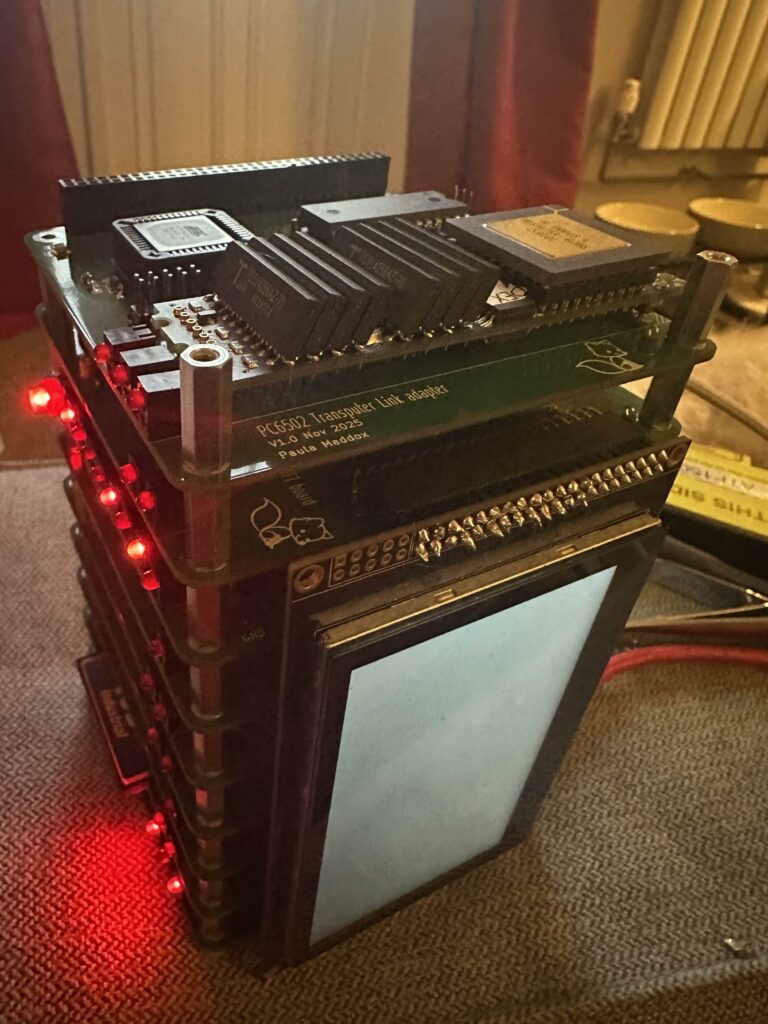
<p>I've tried this with the 4 TRAMs (Transputer Modules) I have and they all work!.<br>Here is the tower with the link adapter and a single TRAM on top.</p>


<figure class="post__image"><img loading="lazy" src="https://maddox.pro/media/posts/53/d8e1e836f8cc85f1-768x1024.jpg" alt=""  sizes="(max-width: 1920px) 100vw, 1920px" srcset="https://maddox.pro/media/posts/53/responsive/d8e1e836f8cc85f1-768x1024-xs.jpg 640w ,https://maddox.pro/media/posts/53/responsive/d8e1e836f8cc85f1-768x1024-sm.jpg 768w ,https://maddox.pro/media/posts/53/responsive/d8e1e836f8cc85f1-768x1024-md.jpg 1024w ,https://maddox.pro/media/posts/53/responsive/d8e1e836f8cc85f1-768x1024-lg.jpg 1366w ,https://maddox.pro/media/posts/53/responsive/d8e1e836f8cc85f1-768x1024-xl.jpg 1600w ,https://maddox.pro/media/posts/53/responsive/d8e1e836f8cc85f1-768x1024-2xl.jpg 1920w"></figure>


<p>It does get a bit toasty, and needs more power than my regular USB A can provide, so I have the USB-C plugged in to the USB PD port on my 6502 tower and I get a nice 4.97V (without this I get 4.6V).</p>


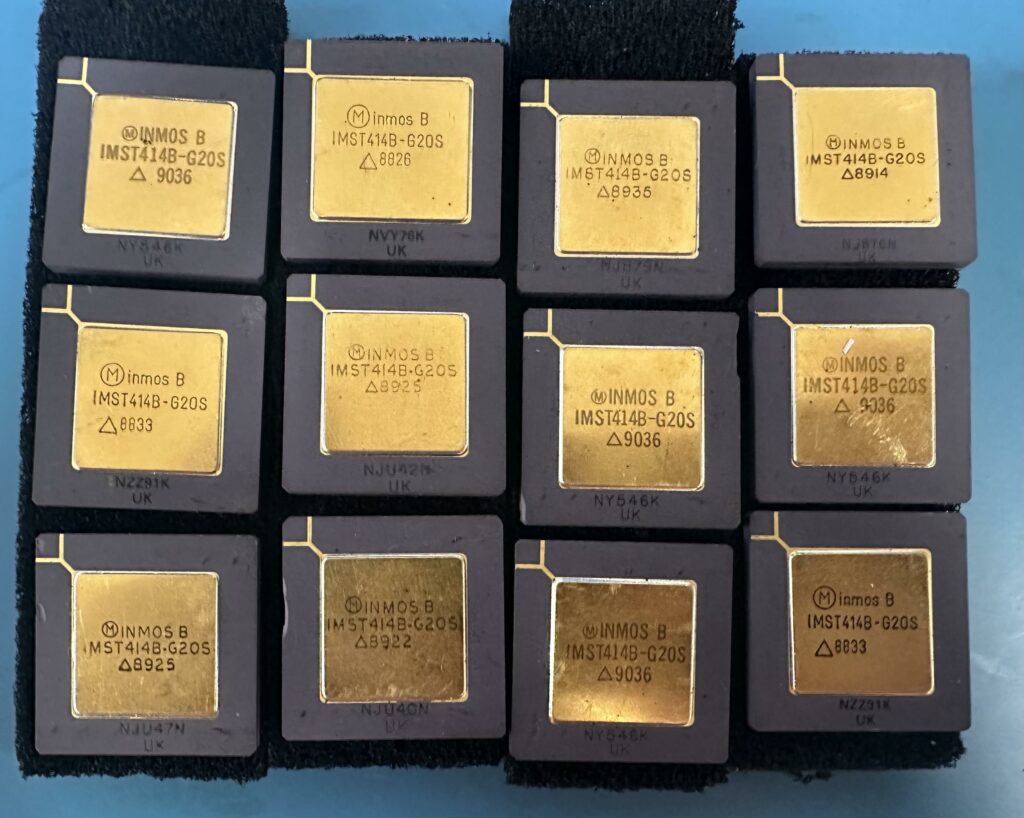
<p>I also have a pile of T414 transputer chips (not as much internal memory as the T425) given to me by someone at work who was clearing out their loft (thank you!), which you can see here - </p>


<figure class="post__image"><img loading="lazy" src="https://maddox.pro/media/posts/53/2409836ca5b1a713-1024x818.jpeg" alt=""  sizes="(max-width: 1920px) 100vw, 1920px" srcset="https://maddox.pro/media/posts/53/responsive/2409836ca5b1a713-1024x818-xs.jpeg 640w ,https://maddox.pro/media/posts/53/responsive/2409836ca5b1a713-1024x818-sm.jpeg 768w ,https://maddox.pro/media/posts/53/responsive/2409836ca5b1a713-1024x818-md.jpeg 1024w ,https://maddox.pro/media/posts/53/responsive/2409836ca5b1a713-1024x818-lg.jpeg 1366w ,https://maddox.pro/media/posts/53/responsive/2409836ca5b1a713-1024x818-xl.jpeg 1600w ,https://maddox.pro/media/posts/53/responsive/2409836ca5b1a713-1024x818-2xl.jpeg 1920w"></figure>


<p>So I need to make some kind of system for these and the other 4 to go into :)</p>


<p>I'm not exactly what form that will take yet, but you know it'll have blinky lights on, it'll also need a beefy PSU and probably a FAN. Each of these pulls nearly 1A and kicks out 4W. so 16 in a box is nearly 64W of heat and power!</p>


<p>But I need to be able to get some simple code running first, so that will be the next thing I work on for the PC6502 :)</p>

            ]]>
        </content>
    </entry>
    <entry>
        <title>PC6502 update</title>
        <author>
            <name>Paula</name>
        </author>
        <link href="https://maddox.pro/pc6502-update/"/>
        <id>https://maddox.pro/pc6502-update/</id>

        <updated>2025-12-23T15:00:22+00:00</updated>
            <summary type="html">
                <![CDATA[
                    I have been tinkering with various bits of the PC6502 computer system in between looking after Suzi (who is getting better slowly, but we still have a couple of months of hard work ahead of us). Previously I was able to show the OPL3 Sound&hellip;
                ]]>
            </summary>
        <content type="html">
            <![CDATA[
                
<p>I have been tinkering with various bits of the PC6502 computer system in between looking after Suzi (who is getting better slowly, but we still have a couple of months of hard work ahead of us).</p>


<p>Previously I was able to show the OPL3 Sound and Speech card working, Here is an updated video of it playing a tune :)</p>


<figure class="wp-block-video"><video loading="lazy" controls src="https://files.mastodon.social/media_attachments/files/115/509/369/052/425/095/original/1b5d278a5585a83d.mp4"></video></figure>


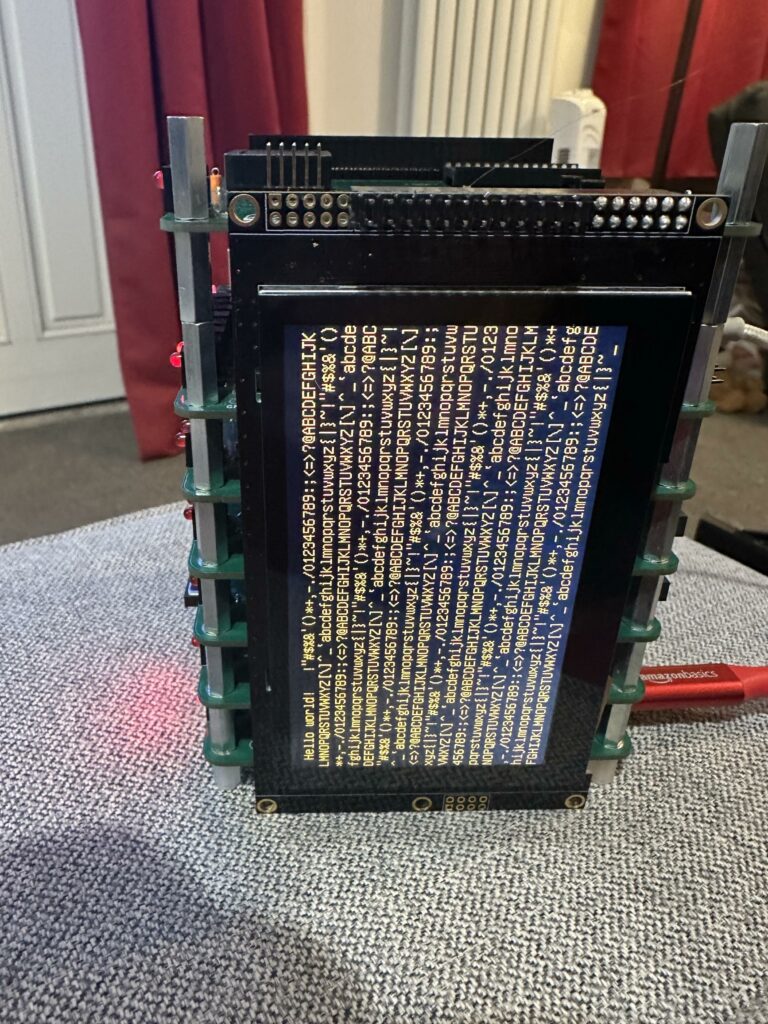
<p>Next I managed to get the display working, this is a 480x272 screen, it has built in fonts and a bunch of features line circle, line drawing and filling, so I can do a bunch of cool things as I go forward with it.</p>


<figure class="post__image"><img loading="lazy" src="https://maddox.pro/media/posts/52/2701c1cd47b1391e-768x1024.jpeg" alt="Text on the PC6502 display"  sizes="(max-width: 1920px) 100vw, 1920px" srcset="https://maddox.pro/media/posts/52/responsive/2701c1cd47b1391e-768x1024-xs.jpeg 640w ,https://maddox.pro/media/posts/52/responsive/2701c1cd47b1391e-768x1024-sm.jpeg 768w ,https://maddox.pro/media/posts/52/responsive/2701c1cd47b1391e-768x1024-md.jpeg 1024w ,https://maddox.pro/media/posts/52/responsive/2701c1cd47b1391e-768x1024-lg.jpeg 1366w ,https://maddox.pro/media/posts/52/responsive/2701c1cd47b1391e-768x1024-xl.jpeg 1600w ,https://maddox.pro/media/posts/52/responsive/2701c1cd47b1391e-768x1024-2xl.jpeg 1920w"></figure>


<p>I've not figured out how to rotate it yet, but that should be fairly straight forward.</p>


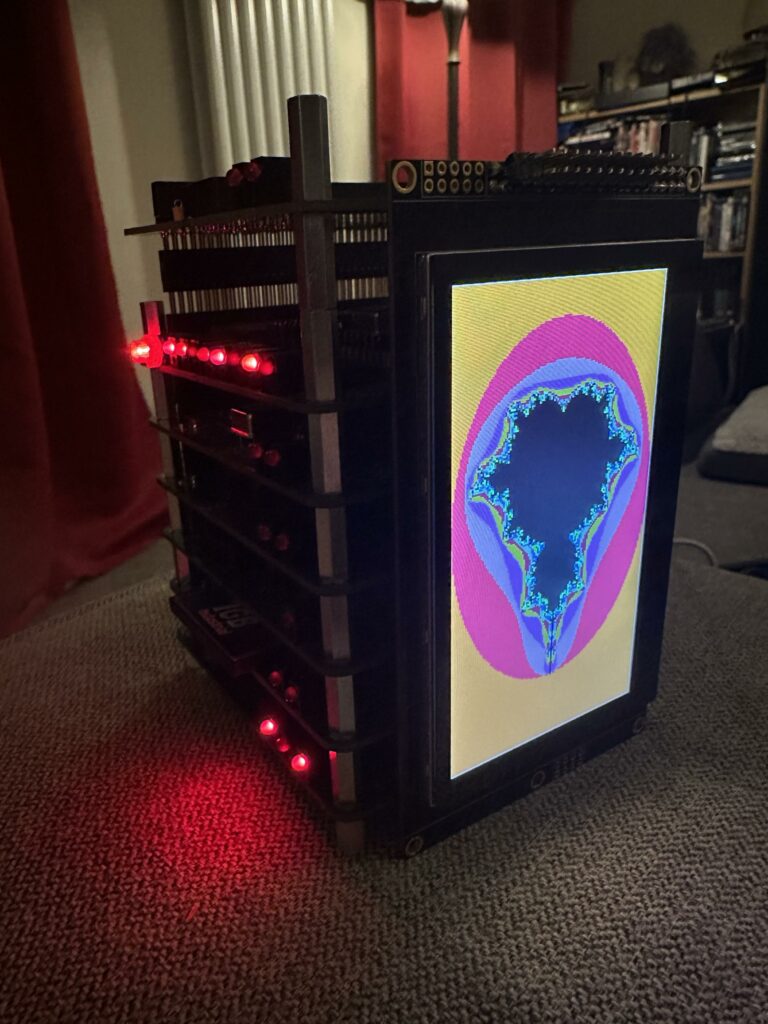
<p>And, of course, I had to do a mandlebrot as I now have colour!</p>


<figure class="post__image"><img loading="lazy" src="https://maddox.pro/media/posts/52/04914a0ef0b1057b-768x1024.jpeg" alt="PC6502 colour mandlebrot"  sizes="(max-width: 1920px) 100vw, 1920px" srcset="https://maddox.pro/media/posts/52/responsive/04914a0ef0b1057b-768x1024-xs.jpeg 640w ,https://maddox.pro/media/posts/52/responsive/04914a0ef0b1057b-768x1024-sm.jpeg 768w ,https://maddox.pro/media/posts/52/responsive/04914a0ef0b1057b-768x1024-md.jpeg 1024w ,https://maddox.pro/media/posts/52/responsive/04914a0ef0b1057b-768x1024-lg.jpeg 1366w ,https://maddox.pro/media/posts/52/responsive/04914a0ef0b1057b-768x1024-xl.jpeg 1600w ,https://maddox.pro/media/posts/52/responsive/04914a0ef0b1057b-768x1024-2xl.jpeg 1920w"></figure>


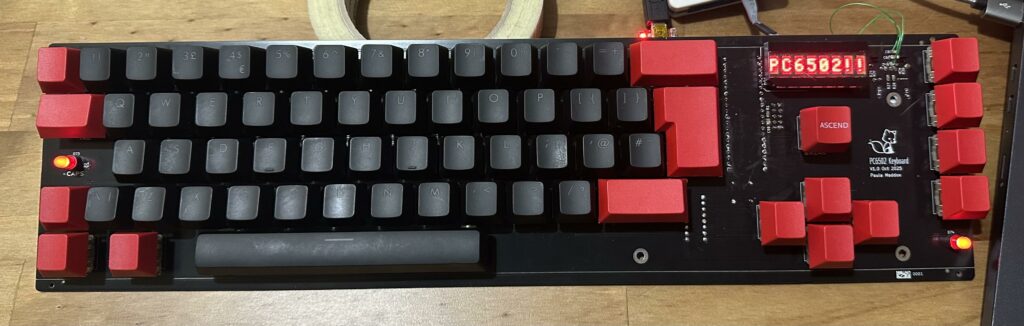
<p>The other things this board does is provide a 6551 serial interface to connect a keyboard to, which I'm now happy to say is working.</p>


<figure class="post__image"><img loading="lazy" src="https://maddox.pro/media/posts/52/keyboard-1024x326.jpeg" alt="PC6502 keyboard (serial in and out)
"  sizes="(max-width: 1920px) 100vw, 1920px" srcset="https://maddox.pro/media/posts/52/responsive/keyboard-1024x326-xs.jpeg 640w ,https://maddox.pro/media/posts/52/responsive/keyboard-1024x326-sm.jpeg 768w ,https://maddox.pro/media/posts/52/responsive/keyboard-1024x326-md.jpeg 1024w ,https://maddox.pro/media/posts/52/responsive/keyboard-1024x326-lg.jpeg 1366w ,https://maddox.pro/media/posts/52/responsive/keyboard-1024x326-xl.jpeg 1600w ,https://maddox.pro/media/posts/52/responsive/keyboard-1024x326-2xl.jpeg 1920w"></figure>


<p>I've not yet integrated this into the firmware, so you can peek/poke from BASIC and it behaves fine.</p>


<p>Next I'm in the middle debugging a transputer link interface for it. Because, why not? It's not fully working yet, I need to tweak the timing of the access to the Inmos C011 Link adapter IC. But it's getting there.</p>


<figure class="post__image"><img loading="lazy" src="https://maddox.pro/media/posts/52/image0-874x1024.jpeg" alt="Debugging the Inmos C011 link adapter.
"  sizes="(max-width: 1920px) 100vw, 1920px" srcset="https://maddox.pro/media/posts/52/responsive/image0-874x1024-xs.jpeg 640w ,https://maddox.pro/media/posts/52/responsive/image0-874x1024-sm.jpeg 768w ,https://maddox.pro/media/posts/52/responsive/image0-874x1024-md.jpeg 1024w ,https://maddox.pro/media/posts/52/responsive/image0-874x1024-lg.jpeg 1366w ,https://maddox.pro/media/posts/52/responsive/image0-874x1024-xl.jpeg 1600w ,https://maddox.pro/media/posts/52/responsive/image0-874x1024-2xl.jpeg 1920w"></figure>


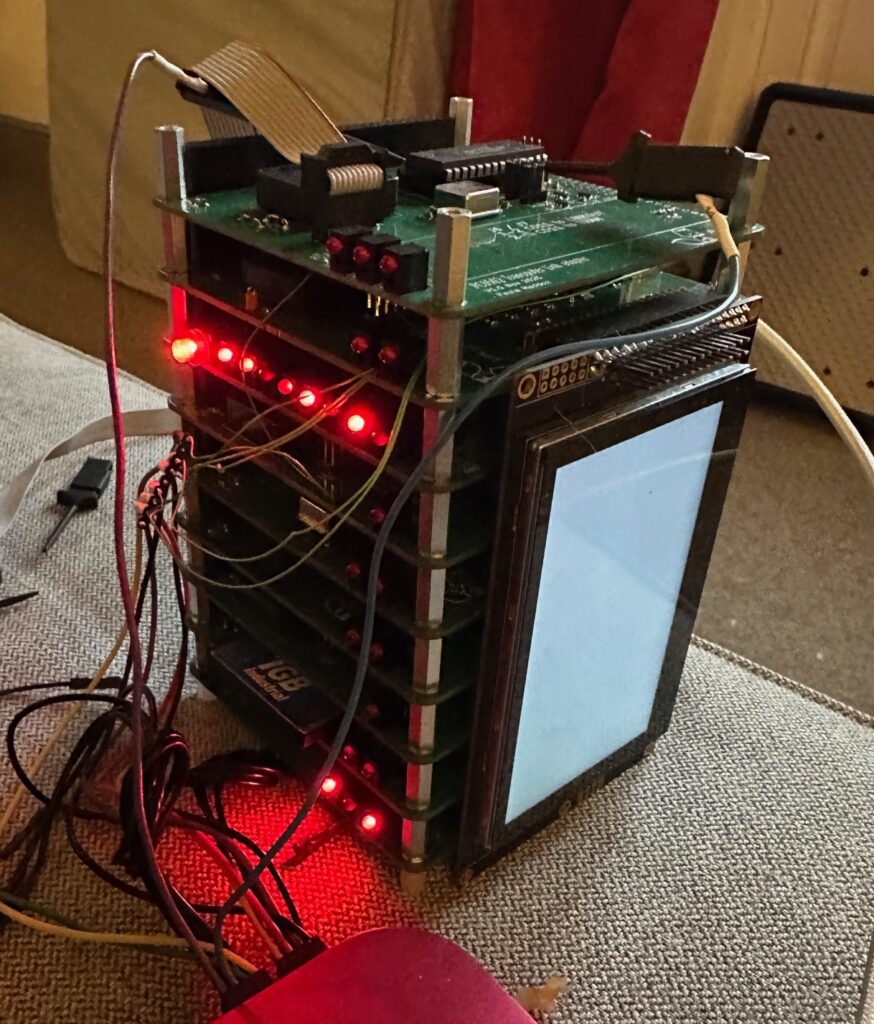
<p>The stack as it stands (top to bottom) is;</p>


<ul class="wp-block-list">
<li>Inmos C011 Link adapter (with space for a single Transputer TRAM)</li>


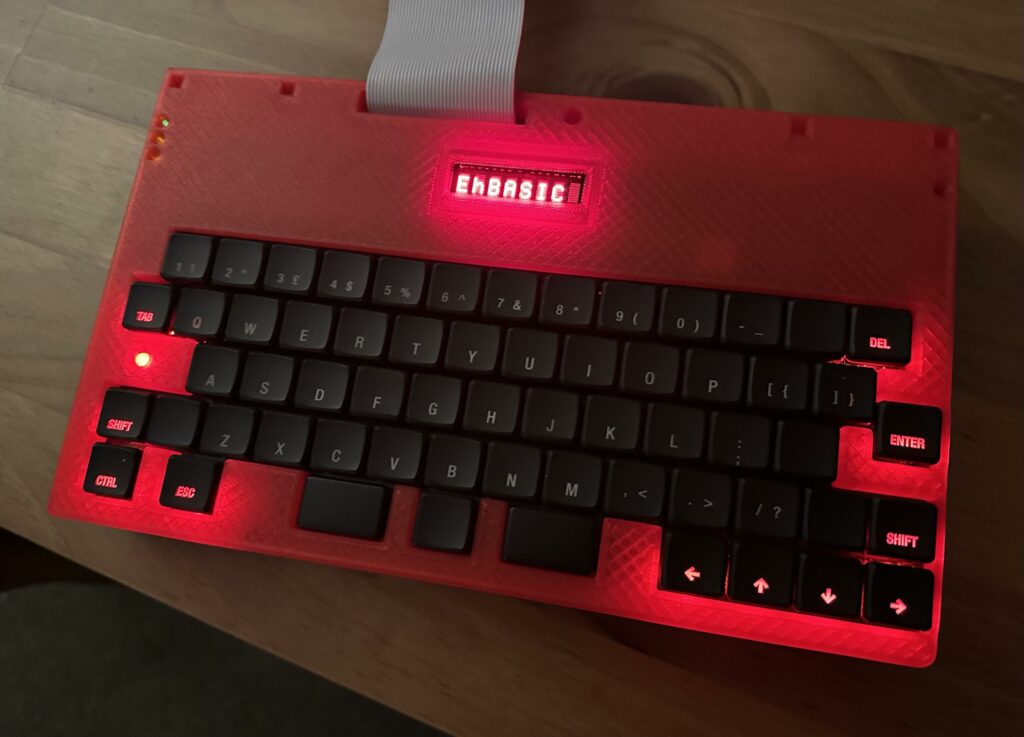
<li>Display/Keyboard card</li>


<li>6502 CPU board (with ROM/RAM/console)</li>


<li>6522 VIA (B)</li>


<li>Speech and OPL3 sound card</li>


<li>Dual SPI card</li>


<li>6522 VIA (A)</li>


<li>Compact Flash</li>


<li>Power supply card</li>
</ul>


<p>Now, all this got me thinking.....</p>


<p>I have a 6502 running EhBASIC, a graphical/text display a keyboard, via and compact flash. So what if I made a laptop?</p>


<p>So, well, errr, I have begun that. Here are some renders.</p>


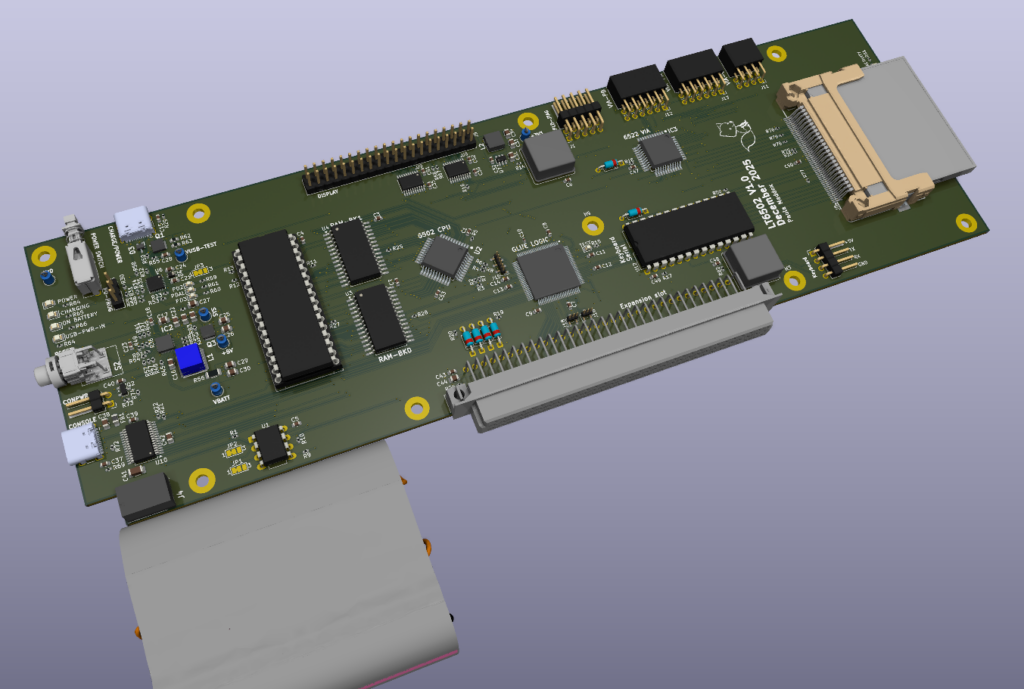
<p>First here is the main board, with CPU, ROM, RAM, Console port (USBC), Serial port (6551), compact flash, VIA and also battery and charging circuit. Oh and an expansion connector.</p>


<figure class="post__image"><img loading="lazy" src="https://maddox.pro/media/posts/52/LT6502_Main-1024x689.png" alt="LT6502 main board render
"  sizes="(max-width: 1920px) 100vw, 1920px" srcset="https://maddox.pro/media/posts/52/responsive/LT6502_Main-1024x689-xs.png 640w ,https://maddox.pro/media/posts/52/responsive/LT6502_Main-1024x689-sm.png 768w ,https://maddox.pro/media/posts/52/responsive/LT6502_Main-1024x689-md.png 1024w ,https://maddox.pro/media/posts/52/responsive/LT6502_Main-1024x689-lg.png 1366w ,https://maddox.pro/media/posts/52/responsive/LT6502_Main-1024x689-xl.png 1600w ,https://maddox.pro/media/posts/52/responsive/LT6502_Main-1024x689-2xl.png 1920w"></figure>


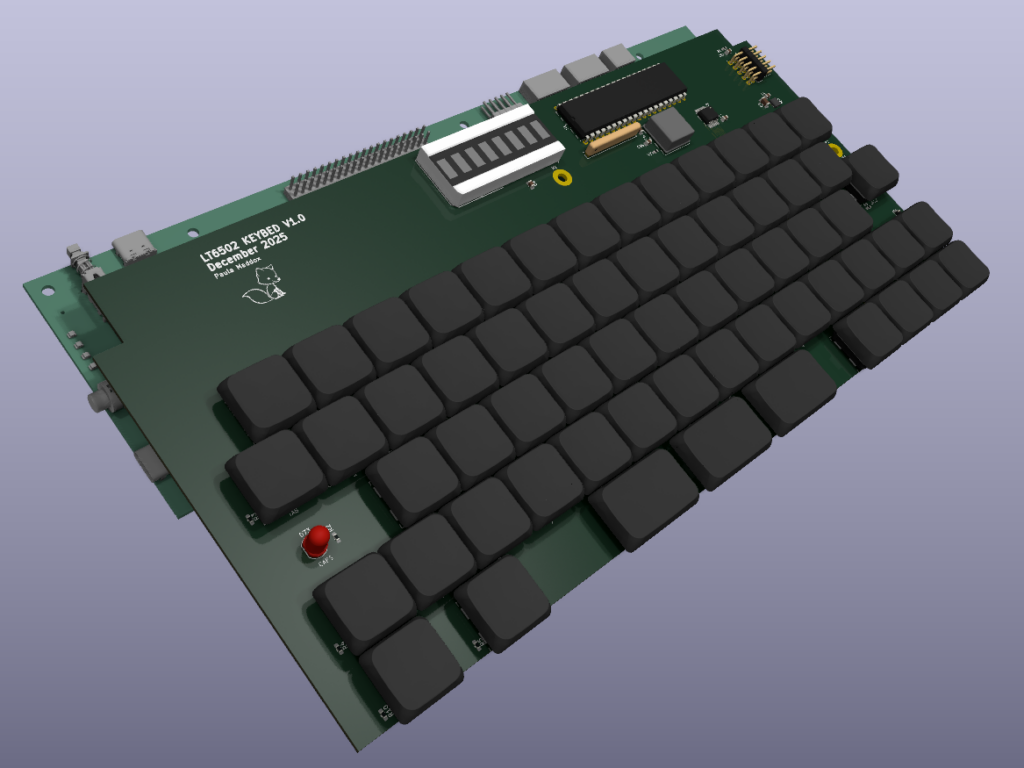
<p>The keyboard (below) sits on top of this and slightly forward so it sits above the battery.</p>


<figure class="post__image"><img loading="lazy" src="https://maddox.pro/media/posts/52/LT6502_KeyMain-1024x768.png" alt="LT6502 Keyboard on top of the main board, render
"  sizes="(max-width: 1920px) 100vw, 1920px" srcset="https://maddox.pro/media/posts/52/responsive/LT6502_KeyMain-1024x768-xs.png 640w ,https://maddox.pro/media/posts/52/responsive/LT6502_KeyMain-1024x768-sm.png 768w ,https://maddox.pro/media/posts/52/responsive/LT6502_KeyMain-1024x768-md.png 1024w ,https://maddox.pro/media/posts/52/responsive/LT6502_KeyMain-1024x768-lg.png 1366w ,https://maddox.pro/media/posts/52/responsive/LT6502_KeyMain-1024x768-xl.png 1600w ,https://maddox.pro/media/posts/52/responsive/LT6502_KeyMain-1024x768-2xl.png 1920w"></figure>


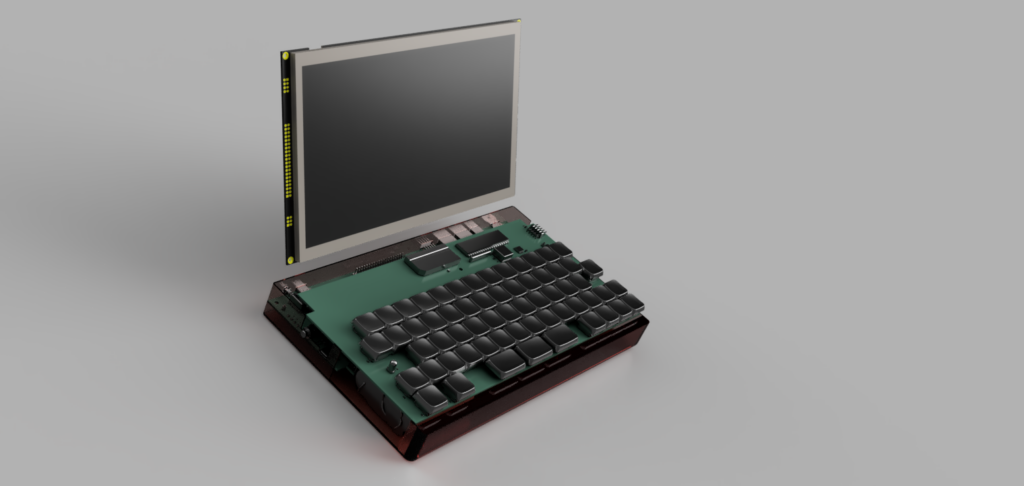
<p>So, we of course need a screen, this time 10", 1024 x 600 and it should work something like this</p>


<figure class="post__image"><img loading="lazy" src="https://maddox.pro/media/posts/52/LT6502_KeyMainScreen.png-1024x486.png" alt="Render of lower half of LT6502 with screen.
"  sizes="(max-width: 1920px) 100vw, 1920px" srcset="https://maddox.pro/media/posts/52/responsive/LT6502_KeyMainScreen.png-1024x486-xs.png 640w ,https://maddox.pro/media/posts/52/responsive/LT6502_KeyMainScreen.png-1024x486-sm.png 768w ,https://maddox.pro/media/posts/52/responsive/LT6502_KeyMainScreen.png-1024x486-md.png 1024w ,https://maddox.pro/media/posts/52/responsive/LT6502_KeyMainScreen.png-1024x486-lg.png 1366w ,https://maddox.pro/media/posts/52/responsive/LT6502_KeyMainScreen.png-1024x486-xl.png 1600w ,https://maddox.pro/media/posts/52/responsive/LT6502_KeyMainScreen.png-1024x486-2xl.png 1920w"></figure>


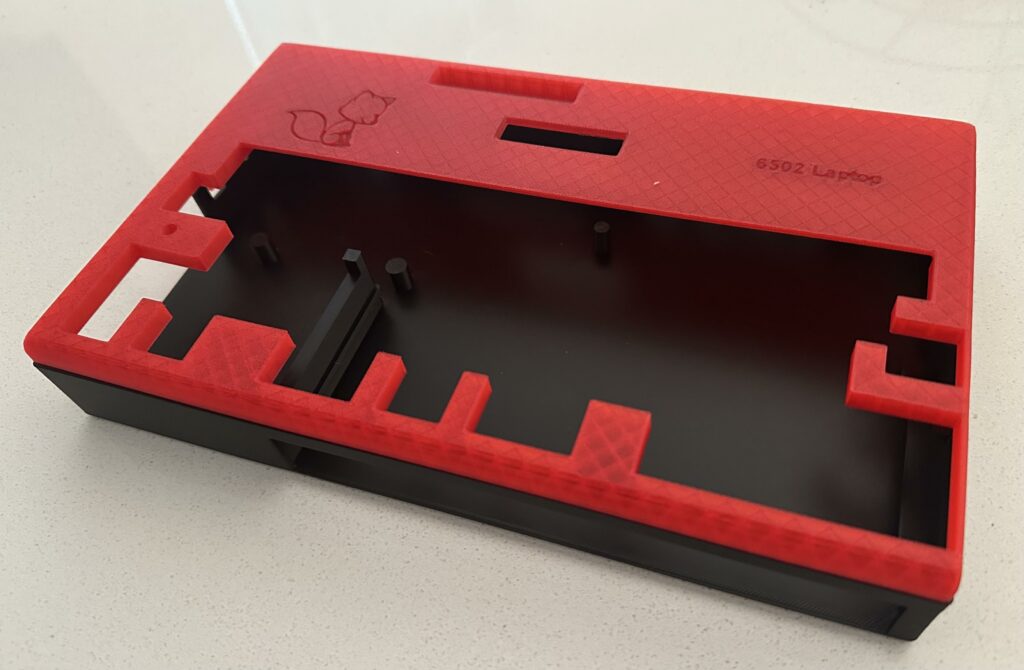
<p>And here is 3D print of the first part of the case (lower part in black, upper in translucent red);</p>


<figure class="post__image"><img loading="lazy" src="https://maddox.pro/media/posts/52/LT6502_testprint-1024x670.jpeg" alt="Test print of the LT6502 case.
"  sizes="(max-width: 1920px) 100vw, 1920px" srcset="https://maddox.pro/media/posts/52/responsive/LT6502_testprint-1024x670-xs.jpeg 640w ,https://maddox.pro/media/posts/52/responsive/LT6502_testprint-1024x670-sm.jpeg 768w ,https://maddox.pro/media/posts/52/responsive/LT6502_testprint-1024x670-md.jpeg 1024w ,https://maddox.pro/media/posts/52/responsive/LT6502_testprint-1024x670-lg.jpeg 1366w ,https://maddox.pro/media/posts/52/responsive/LT6502_testprint-1024x670-xl.jpeg 1600w ,https://maddox.pro/media/posts/52/responsive/LT6502_testprint-1024x670-2xl.jpeg 1920w"></figure>


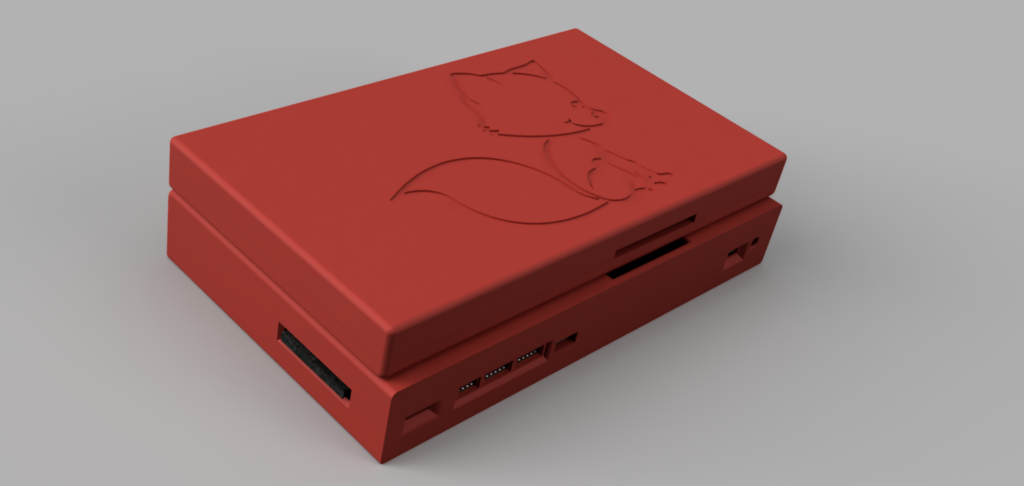
<p>And here is a render of the whole thing with the lid closed (viewed from the rear left).</p>


<figure class="post__image"><img loading="lazy" src="https://maddox.pro/media/posts/52/LT6502_CaseClosed-1024x486.png" alt="LT6502, rear view showing the upper and lower case)
"  sizes="(max-width: 1920px) 100vw, 1920px" srcset="https://maddox.pro/media/posts/52/responsive/LT6502_CaseClosed-1024x486-xs.png 640w ,https://maddox.pro/media/posts/52/responsive/LT6502_CaseClosed-1024x486-sm.png 768w ,https://maddox.pro/media/posts/52/responsive/LT6502_CaseClosed-1024x486-md.png 1024w ,https://maddox.pro/media/posts/52/responsive/LT6502_CaseClosed-1024x486-lg.png 1366w ,https://maddox.pro/media/posts/52/responsive/LT6502_CaseClosed-1024x486-xl.png 1600w ,https://maddox.pro/media/posts/52/responsive/LT6502_CaseClosed-1024x486-2xl.png 1920w"></figure>


<p>You can see the compact flash card on the left, a slot for the volume control thumb wheel, VIA ports, JTAG port for main CPLD Glue Logic and USB port for charging.<br>The long hole on the top of the base, and back of the lid, is for the 40 pin IDC going between the base and the lid for the display.</p>


<p>Now I'm not a mechanical engineer, so this isn't "sleek", it's about 50mm thick in total. The bit I'm struggling with at the moment is the hinges. What I need are "torque" or "friction" hinges. I've worked out I need something around 0.3Nm (based on an online calculator I found). Now finding these is proving extremely difficult and trying to find them with drawings/models is adding to the challenge.</p>


<p>I have ordered the PCBs for the 6502 Laptop, so whilst they're being made I can work on locating suitable hinges.</p>

            ]]>
        </content>
    </entry>
</feed>